Wouldn’t be so sweet if your mobile rings as “hey my sweetheart!” when it receives a call from your girlfriend? I know that should be the sweetest ringtone you can ever have. We have already seen an app that lets you to extract sound any other application and set that as ringtone. But some times, you might wish to have a custom ringtone and it will be nice to have different one too. Here we are going to see few steps to help you record voice of your loved one and set that as ringtone when they call you. Ok! Lets do it right now,
Start Recording the Voice message
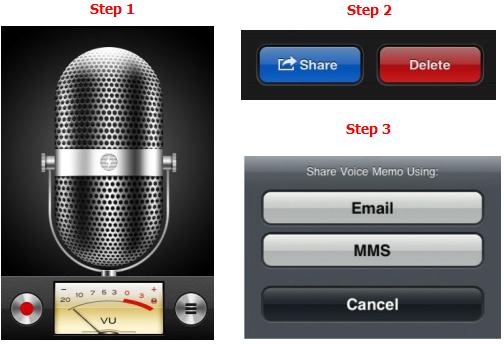
Step 1: Access “Voice Memos” and tap the red button to record your loved one’s voice.
Step 2: Tap on the recorded voice memo and tap “Share” button and select “Email” and send it yourself. I mean, mail it to your email id, so that you can check from your computer.
For now we are done with your iPhone, so move on to your PC; either Mac or Windows.
Change the File extension of Voice memo into Ringtone & Import it to iTunes
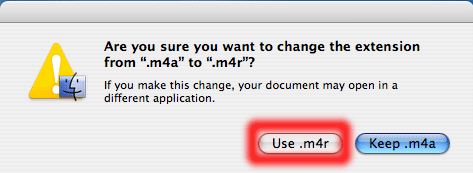
All your voice memo recordings will be saved as “.m4a” file format, so it has to be converted to a ringtone format (.m4r). But that’s very simple. Here we go,
Step 1: Access your email and download the Voice memo that was shared from your iPhone.
Step 2: Change the file extension from .m4a to .m4r
Step 3: Double click the renamed file to open it into iTunes, it will be stored under “Tones”
Step 4: Now connect your iPhone to computer and simply drag and drop the ringtone from “Tones” to iPhone.
Ok! Now you have converted the Voice Memo into Ringtone. Say bye to your PC and go back to your iPhone to assign the voice recording as ringtone.
Set Voice Memo as Ring Tone or Text Tone
Step 1: Open ‘Contacts’ and go the contact name and tap ‘Edit‘
Step 2: Choose to change ringtone or text tone of that contact.
Step 3: Look into “Ringtones” and select the file that you created earlier and tap “Save”
That’s it! Now you have set a custom ringtone.


I followed these steps (exactly), but I still can’t get this to work. After I dragged the tone to the iphone it shows ul, but is grayed out and can’t be accessed through the sounds menu on the phone (not even there). Am I missing something else? If so could someone please help (using a PC).
Depending on which version of iTunes you’re using, you may need to wait for the program to recognize that you have imported a ringtone file type into it (the .m4r). After it has recognized your ringtone, you will end up with a new category in your menu called Tones. (This will only show up if you have imported your own ringtones into iTunes.) When you connect your phone to your computer, you will also see this category in your phone’s menus. Note: again, depending on the version of iTunes you have, you may not
have the option to just drag the tone to your phone like you have
previously done. You instead get to Sync your Tones and can select whether you want to Sync all the tones or just the Selected Tones. Also, if you are planning on making a lot of ring tones, or are making tones for more than one user (ie husband and wife making tones for their own contacts), you may want to use the Selected Tones option. Hope this helps! 🙂