In continuation to our tutorial on Getting started with Android studio, today lets try to create a simple app that will read a password as input and display it as Toast using Android Studio. If you were wondering what is Toast in Android, then here it is: Toast in Android provides simple feedback to the user as a small popup. By default Toast doesn’t consume much space in the app, but fills the amount of space required to display the message and lives for a short duration. For example, you might have noticed “Connected to WiFi Network” toast; which lets you to know that you are connected to a particular network. Today we will see how to create a Toast that will display password entered by the user.
Ok! Let’s start!
Step 1: Create a New project as shown in this tutorial.
Step 2: Click on the “Project” tab located on the left side of the application and drill down to the activity_main.xml located under ‘res>layout’. Note: Name ‘activity_main.xml’ might vary in your project.
Step 3: Copy and paste below code in activity_main.xml
<EditText
 android:id="@+id/txtPassword"
 android:layout_width="match_parent"
 android:layout_height="wrap_content"
 android:inputType="textPassword"
 android:layout_below="@+id/textView" android:layout_centerHorizontal="true" android:layout_marginTop="20dp">
 <requestFocus />
 </EditText>

 <Button
 android:id="@+id/btnSubmit"
 android:layout_width="wrap_content"
 android:layout_height="wrap_content"
 android:text="@string/btn_submit"
 android:layout_below="@+id/txtPassword" android:layout_alignLeft="@+id/txtPassword"
 android:layout_marginTop="10dp"/>
 <TextView

 android:layout_width="wrap_content"
 android:layout_height="wrap_content"
 android:id="@+id/textView" android:layout_alignParentTop="true"
 android:layout_alignLeft="@+id/txtPassword" android:text="@string/Enterpassword"/>
Step 4: Open strings.xml under ‘res > values‘ and code the below lines
<string name="btn_submit">Submit</string>
<string name="Enterpassword">Enter your password</string>
Step 5: Lets add a reference to visual elements. To do that, go to MainActivity.java and code the below lines in ‘public class MainActivity extends Activity‘ class.
private EditText password;
private Button btnSubmit;
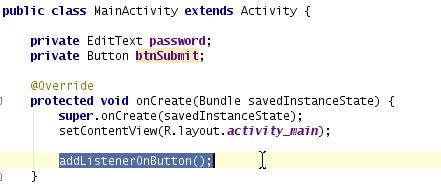
Step 6: Now declare a new method named addListenerOnButton in OnCreate method as shown below
Step 7 : Lets define addListenerOnButton as below,
public void addListenerOnButton() {

 password = (EditText) findViewById(R.id.txtPassword);
 btnSubmit = (Button) findViewById(R.id.btnSubmit);

 btnSubmit.setOnClickListener(new View.OnClickListener() {

 @Override
 public void onClick(View v) {
 Toast toast = new Toast(getApplicationContext());
 toast.setGravity(Gravity.TOP|Gravity.LEFT, 0, 0);
// Toast toast = Toast.makeText(context, text, duration);
 toast.makeText(MainActivity.this, password.getText(), toast.LENGTH_SHORT).show();

 }

 });

 }
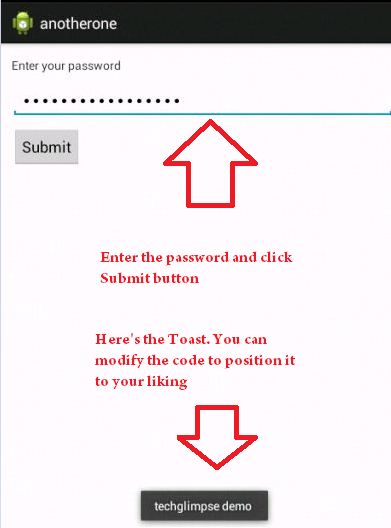
Step 8: That’s it! Save the code and build it to see an app like the below one,


Easy to understand and we’ll explained thank you author for the amazing article!??
thank you, good sir.