First of all why you should migrate your subscriber list from FeedBurner to MailChimp? Well, I have few reasons. The first reason is due to the lack of mail delivery options in FeedBurner. I was not able to send weekly Newsletter to my subscribers and was forced to deliver it daily. The result, the subscribers were annoyed seeing my daily mails and started to unsubscribe. The second was due to the lack of templates and the ability to have custom newsletter layouts. The last reason was due to the speculation around the future of FeedBurner. Google discontinued FeedBurner API and that quietly created a doubt over the service’s future. And then I realized to switch my subscriber list from FeedBurner to MailChimp.
MailChimp has all the necessary features and tools to support your email marketing needs. Ok! let me come back to the topic. I’m going to share the steps to migrate your FeedBurner subscriber list to MailChimp.
Export FeedBurner Subscriber List
Step 1: Head on to feedburner.com and login with your credentials
Step 2: Select your Feed.
Step 3: Click on “Subscribers” under Feed Stats (on the left sidebar)
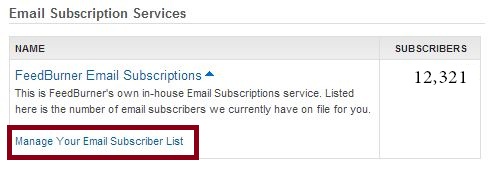
Step 4: Scroll down to find “Email Subscription Services” and click “FeedBurner Email Subscriptions” > “Manage Your Email Subscriber List“.
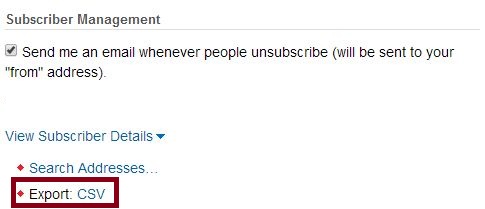
Step 5: Scroll down to find “View Subscriber Details” under Subscriber Management.
Step 6: Click “CSV” to export all the subscriber email ids to CSV file.
Done! Now you have exported the subscriber list from FeedBurner.
How to Import FeedBurner Subscriber List into MailChimp?
Step 1: Jump to mailchimp.com and sign-up for a free account.
Step 2: Login into Mailchimp with your registered credentials.
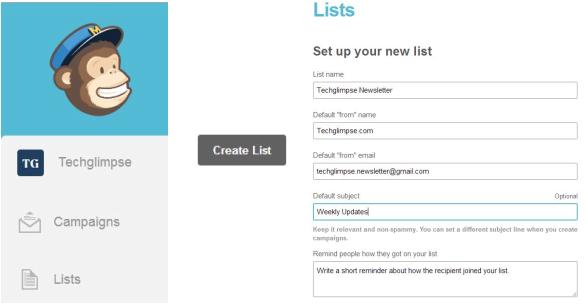
Step 3: Click on “Lists” from the left side menu and then click “Create List”
Step 4: Put in the basic information about the list. Read through the hints displayed under every textbox. Once done, click “Save” to create a new list.
Step 5: Click on the small drop down menu located to the right of the list name and select “Import“.
Step 6: In the import page, click “Upload from a CSV or TXT file“. Select the CSV file (the subscriber list exported from FeedBurner) and import it. While importing, you have to identify the column names accordingly. For instance, the first column would be emailaddress of the subscriber, the second column would be the date and time of the subscription and the third column would be the verification status.
That’s it. Now you have successfully imported your FeedBurner subscribers to MailChimp List. Lets create a campaign that would mail your RSS feed to subscribers.
How to create a RSS-Driven Campaign in MailChimp?
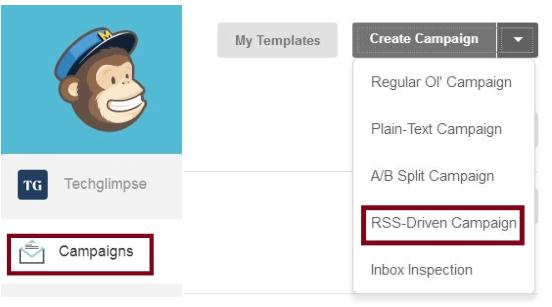
Step 1: Click on “Campaign” from the left side menu.
Step 2: Click on “Create Campaign” pull down menu and select “RSS-Driven Campaign”
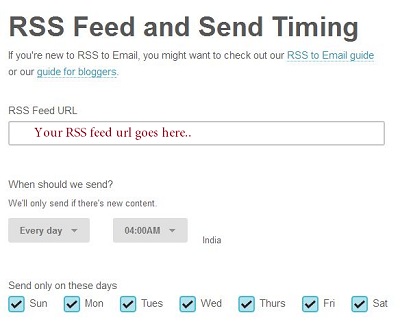
Step 3: Feed-in your RSS URL and choose delivery schedule.
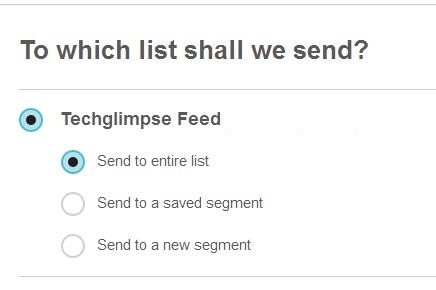
Step 4: In the next page, you will have to choose the list (the subscriber email list)
Step 5: This step is very important, as you will be naming your Campaign, Email Subject, Reply-To Email Address etc…
Step 6: Next comes the design section. You can choose to design your own custom templates or choose from predefined templates. For RSS driven campaign, I suggest you to click “Predefined” and filter for “RSS-To-Email”. I personally suggest “RSS 1B, RSS 1C, RSS 2B and RSS 2C”.
Step 7: Once done, you can customize the template to your needs.
Step 8: Preview the template design, by clicking “Open popup Preview” or by sending a Test mail.
Step 9: Finally, start the campaign by clicking “Start RSS Campaign” button.
Viola! You have successfully integrated your RSS feed to send mail.
How to add MailChimp RSS Subscription Form to your Website?
Step 1: Click on “Lists” from the left side menu.
Step 2: Click on the pull down next to stats button and select “Signup forms“
Step 3: In the next page, choose the integration method and carefully edit the email templates. Once done, copy the code and paste it into your website.
Finally, remember to deactivate the FeedBurner mail delivery. That’s it!

