
Here we are back again with a tutorial on How to Install Qiskit on Windows 10. We will also learn to setup Jupyter Notebook, an Opensource web application that helps you to write Python programs and execute it with a click of a button. Well, Jupyter Notebook supports multiple programming languages such as C++, R etc., but we are going to focus on Python, the language that we will use for writing Qiskit programs. If you are a Linux user, then you may jump to this guide on installing Qiskit on Ubuntu.
Install Anaconda Python Distribution
Step 1: Download the Anaconda Python installer for Windows.
Step 2: Once the installation is complete, launch the “Anaconda Prompt”

Install Qiskit on Windows
Step 3: In the anaconda prompt, type “pip install qiskit qiskit-aer qiskit-ibmq-provider”
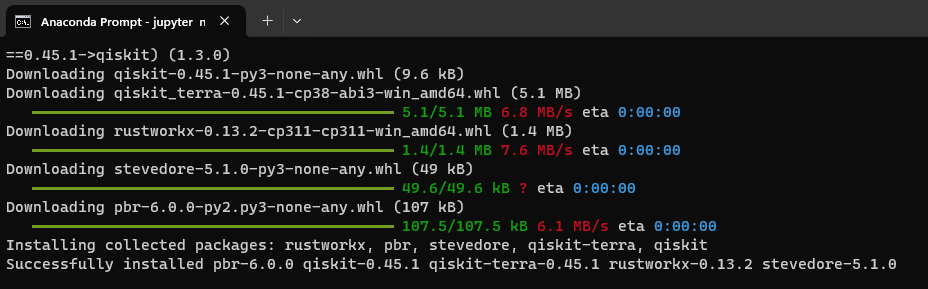
The installation process might take a few minutes to complete. Once the installation is successful, go ahead and start the Jupyter notebook.
Launch Jupyter Notebook
Step 4: You are all set to launch the Jupyter Notebook by typing the command “jupyter notebook”

Once the Jupyter Notebook is started, you can access the notebook using the URL printed in the command output.
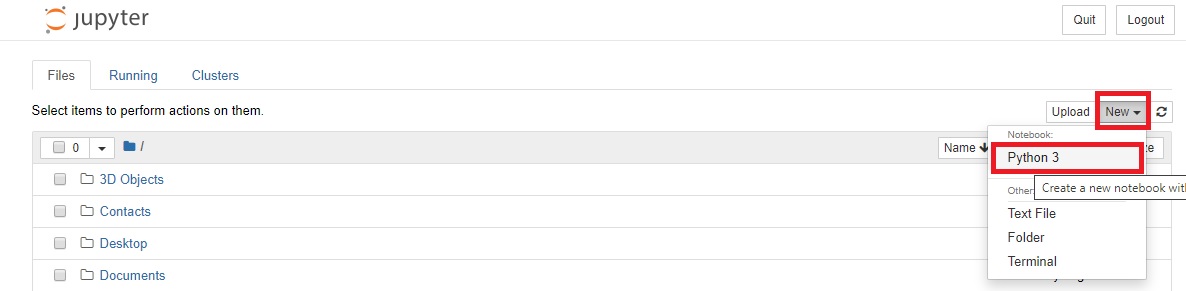
Step 5: Let’s create a new Python 3 Notebook by clicking New > Python 3. This will open a new tab with an editor to write and execute Python programs.
Don’t worry, If you are not familiar with the Jupyter interface. It’s super simple to use. You just need to write your code inside the Code Cells and hit “Shift+Enter” or click on “Run” button from the toolbar to execute it. During the execution process, you will see an asterisk displayed next to “In [*]” and the output is displayed right below the code cell after the execution.
Ok. Let’s start writing the code by importing the Qiskit first.
Step 6: Import Qiskit by typing “import qiskit” and hit “Shift+Enter“.
The above command will not display any output, as we have just imported the Qiskit library.
Step 7: Let’s now check the version of Qiskit imported by typing the below line.
qiskit.__qiskit_version__
Output:
{'qiskit': '0.45.1', 'qiskit-aer': None, 'qiskit-ignis': None, 'qiskit-ibmq-provider': None, 'qiskit-nature': None, 'qiskit-finance': None, 'qiskit-optimization': None, 'qiskit-machine-learning': None}Well, we are all set and ready to write our first Qiskit program.
First Qiskit Program
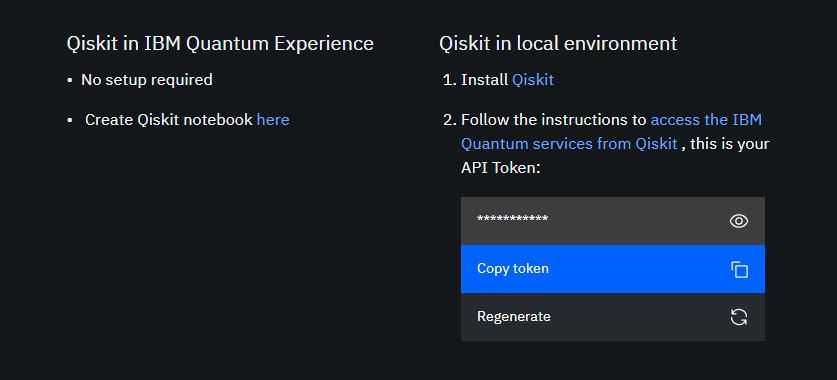
In order to execute our program, we can either use a Quantum simulator or a real Quantum device. To use IBM’s Quantum device, we need to create an API token from the IBM Q Experience website.
Step 8: Go to https://quantum-computing.ibm.com/ and sign-up to create your account
Step 9: Upon sign-in, click on the user icon on the top right corner and select "My Account"
Step 10: Click the "Copy token" (blue button) to copy your API token to the clipboard.
Step 11: Let us now go ahead and import IBMQ from Qiskit by typing the below line in the Jupyter Notebook and hit “Shift+Enter”
from qiskit_ibm_provider import IBMProvider
Note: If you get an error, then probably you may not have the package installed. Install using the below command:
anaconda> pip install qiskit_ibm_provider
Step 12: You now have an IBM Q Experience’s API token, so let’s save that to your computer by typing the below line and hit “Shift+Enter”
IBMQ.save_account('<YOUR-IBM-API-TOKEN>')
Remember to replace YOUR-IBM-API-TOKEN with your own.
Once executed, IBM’s API token is now saved onto your computer and you are now ready to access IBM’s Quantum devices.
On Windows, look out for .qiskit folder under the user’s home directory. For example, in my PC it is ‘C:\Users\Admin\.qiskit>‘. Open the file qiskitrc and verify if the token saved token.
Step 13: To see that we have connected to the IBM’s Quantum devices, type the below code in the Notebook and hit “Shift+Enter”
IBMQ.load_account()
Upon execution, you will see the output as shown below:

Step 14: You are now ready to write your first Qiskit program and execute it on a simulator and also on real Quantum hardware. Shall we?
Executing ‘Entanglement’ circuit on the IBM Quantum Computer.
Copy the below code and paste it into the Jupyter code cell and execute it.
from qiskit import QuantumCircuit, transpile
from qiskit_ibm_provider import IBMProvider

# Save account credentials.
IBMProvider.save_account(token='<YOUR-IBM-API-TOKEN>')

# Load previously saved account credentials.
provider = IBMProvider()

# Create a circuit
qc = QuantumCircuit(2)
qc.h(0)
qc.cx(0, 1)
qc.measure_all()

# Select a backend.
backend = provider.get_backend("ibm_brisbane")
#backend = provider.backend.ibm_brisbane

# Transpile the circuit
transpiled = transpile(qc, backend=backend)

# Submit a job.
job = backend.run(transpiled)
# Get results.
data = job.result().get_counts()
print(data)
plot_histogram(data)
You should see the circuit printed as below:

The above program represents a quantum entanglement circuit with the help of Hadamard and C-NOT gates. Not sure what these gates do? You will get those details here. In simple terms, the hadamard gate on the first qubit (q_0) places it in superposition state and C-NOT gate flips the state of target qubit (q_1) when the control qubit (q_0) is in the state ‘1’ and does nothing when the control qubit (q_0) is zero. Hence, the probability count of states ’00’ & ’11’ would be larger than the other states. Considering that the circuit was executed on the real hardware, the imperfections of the hardware would result in having some probabilities distributed across non-ideal states such as ’01’ and ’10’ and that’s is called as Quantum Noise. Well, we will speak the noise & its impact another day.
Till then happy Qiskitttttttttttttttttting.

I love how detailed it was with images, maybe next time an animation will help …thanks!!
A well explained proceedure
Very clear and precise presentation – thank you
Hello I did every step but in IBM API token its error why
configrc.store_credentials:WARNING:2021-06-06 20:27:01,510: Credentials already present. Set overwrite=True to overwrite.
Right explanation. Thank you!