
Want to try your hands in Quantum Computing? The best way to start is with IBM Qiskit. In this article, you’ll learn how to install Qiskit on Ubuntu and simulate your first quantum program. If you are a Windows user, then you can click on this link to learn how to Install Qiskit on Windows 10 and set up Jupyter Notebook for writing and executing your Quantum circuits on IBM’s real quantum hardware.
Requirements
- Ubuntu 16.* or later
- Python 3.5 or later. If you don’t have Python, then refer to this guide to install one.
- Conda
Installing Qiskit
Step 1: It’s recommended to create a Python virtual environment using Conda.
conda create -n qiskit python=3
Step 2: Activate the environment
source activate qiskit
Step 3: Install Qiskit
#pip install qiskit
Step 4: Install Qiskit visualization packages
pip install qiskit-terra[visualization]
Step 5: Check Qiskit version
$ python
Python 3.8.1 (default, Jan 8 2020, 22:29:32)
[GCC 7.3.0] :: Anaconda, Inc. on linux
Type "help", "copyright", "credits" or "license" for more information.
>>> import qiskit
If everything went well, the above command will not return any error.
Run the below commands to check the version of Qiskit and related packages.
>>> qiskit.__version__
'0.12.0'

>>> qiskit.__qiskit_version__
{'qiskit-terra': '0.12.0', 'qiskit-aer': '0.4.0', 'qiskit-ignis': '0.2.0', 'qiskit-ibmq-provider': '0.4.6', 'qiskit-aqua': '0.6.4', 'qiskit': '0.15.0'}
Setup simulation environment using IBM Q Experience with Qiskit
IBM provides several real Quantum computers and simulators through IBM Q Experience. All you need to do now is to obtain an API token from IBM Q Experience and use it with Qiskit for simulations.
Step 1: Go to https://quantum-computing.ibm.com/ and sign-up to create your account
Step 2: Click on the user icon on the top right corner and select "My Account"
Step 3: Click the "Copy token" (blue button) to copy your API token to the clipboard.
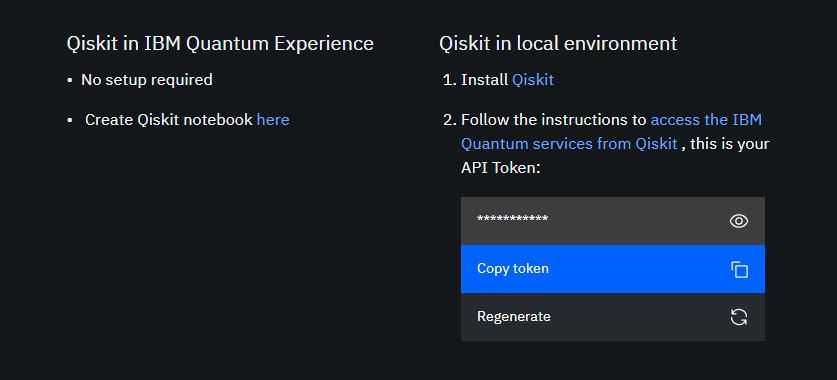
Step 4: Create a new file in the name of qiskitrc inside ‘~/.qiskit/qiskitrc‘
$ vim ~/.qiskit/qiskitrc
Copy & paste the below lines and replace <YOUR-IBM-API-TOKEN> with the one obtained from Step 3.
[ibmq]
token = <YOUR-IBM-API-TOKEN>
url = https://auth.quantum-computing.ibm.com/api
verify = True
Alternatively, the file can be automatically generated by executing the below lines in Python prompt as shown below.
#python
>>> from qiskit import IBMQ
>>> IBMQ.save_account('<YOUR-IBM-API-TOKEN>')
After executing the above lines confirm if the file 'qiskitrc' is created inside ~/.qiskit/ folder.
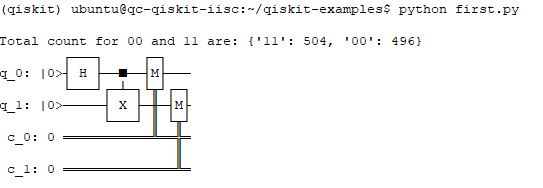
Well, you are now all set to simulate your first Quantum program.
For now, just copy and paste the below code in first.py
import numpy as np
from qiskit import(
  QuantumCircuit,
  execute,
  Aer)
from qiskit.visualization import plot_histogram

# Use Aer's qasm_simulator
simulator = Aer.get_backend('qasm_simulator')

# Create a Quantum Circuit acting on the q register
circuit = QuantumCircuit(2, 2)

# Add a H gate on qubit 0
circuit.h(0)

# Add a CX (CNOT) gate on control qubit 0 and target qubit 1
circuit.cx(0, 1)

# Map the quantum measurement to the classical bits
circuit.measure([0,1], [0,1])

# Execute the circuit on the qasm simulator
job = execute(circuit, simulator, shots=1000)

# Grab results from the job
result = job.result()

# Returns counts
counts = result.get_counts(circuit)
print("\nTotal count for 00 and 11 are:",counts)

# Draw the circuit
print(circuit.draw(output='text'))
Note: Refer in-line comments to understand what the program does. We will learn how Qiskit works in a separate tutorial.
Try executing the program as below.
# python first.py
You should now see the output along with the circuit composed.
To plot the histogram using Matplotlib
Add the below line to the top of the code.
import matplotlib.pyplot as plt
Create a function definition 'show_figure'
def show_figure(fig):
# See https://github.com/Qiskit/qiskit-terra/issues/1682
new_fig = plt.figure()
new_mngr = new_fig.canvas.manager
new_mngr.canvas.figure = fig
fig.set_canvas(new_mngr.canvas)
plt.show(fig)
Add the below line to print histogram:
#To plot using histogram by passing the figure to matplotlib
show_figure(plot_histogram(counts))
Save the circuit by adding the below lines to the code
#To save the circuit as file using matplotlib
circuit.draw(output='mpl', filename='my_circuit.png')
You can also learn Qiskit by playing a game! Head on to this article that explains learning Quantum computing through games.
