If you are new to HTML5 Canvas Tutorial, then checkout our previous article that talks about What is Canvas and how to use it to draw a line. Today we’ll see how to create custom shapes, Circle, Semi-circle and Rectangle using Canvas element in HTML5. To create custom shapes, we have to create a closed path; this involves in creating a path and then closing it with closePath() method. The arcTo(), bezierCurveTo(), quadraticCurveTo(), thelineTo() methods can be used to create sub-path to complete a shape. You can also create custom shapes using CSS3. Learn more about custom shapes using CSS3.
For example, lets create a custom shape by starting a path, moving to a co-ordinate, use any of the above said methods to create a line or curve or arc and then finally close the path. Sample code is below:
<canvas id="customShapes" width="500" height="250"></canvas>
<script>
var canvas = document.getElementById('customShapes');
var context = canvas.getContext('2d');
context.beginPath();
context.moveTo(180, 90);
context.lineWidth = 8;
context.strokeStyle = '#e53d37';
context.moveTo(170, 80);
context.bezierCurveTo(140, 110, 140, 160, 240, 160);
context.bezierCurveTo(260, 190, 330, 190, 350, 160);
context.bezierCurveTo(430, 160, 430, 130, 400, 100);
context.bezierCurveTo(440, 50, 380, 40, 350, 60);
context.bezierCurveTo(330, 15, 260, 30, 260, 60);
context.bezierCurveTo(210, 15, 160, 30, 180, 90);
context.fillStyle = '#a69c9c';
context.fill();
context.closePath();
context.stroke();
</script>
In the above code, you can see new methods which we haven’t talked before. The fillStyle property that allows you to set fill color and then followed by fill() method, which actually fills the set color. Most importantly, the beginPath() and closePath() methods, which creates a path to draw and close respectively. For the example, I wanted to create a cloud kind of a shape, so the bezierCurveTo() method was used. Of course, you can use arcTo(), quadraticCurveTo(), thelineTo() methods to create the shape of your choice.
Create Rectangle
To create rectangle, we’ll use rect() method with the co-ordinates as parameters. Rest! you know well!
<canvas id="rectangle" width="500" height="250"></canvas>
<script>
var canvas = document.getElementById('rectangle');
var context = canvas.getContext('2d');
context.beginPath();
context.rect(100, 40, 100, 180);
context.fillStyle = '#2d78ba';
context.fill();
context.lineWidth = 8;
context.strokeStyle = '#e53d37';
context.stroke();
</script>
Creating Circle
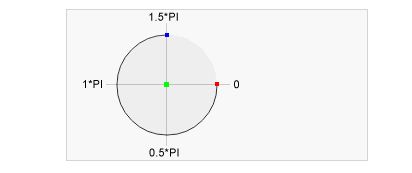
To create a circle, we’ll use arc() method with parameters reading x co-ordinate of the center of circle, y co-ordinate of the center of circle, radius, starting angle as ‘0’ and ending angle as twice the PI value. The arc() method takes optional parameter called “counterclockwise”, which defines whether drawing should be clockwise or counterclockwise. Here’s how the PI value is represented.
<canvas id="circle" width="500" height="250"></canvas>
<script>
var canvas = document.getElementById('circle');
var context = canvas.getContext('2d');
var center_X = canvas.width / 2;
var center_Y = canvas.height / 2;
var radius = 80;
context.beginPath();
context.arc(center_X, center_Y, radius, 0, 2 * Math.PI, false);
context.fillStyle = '#f7ca0f';
context.fill();
context.lineWidth = 8;
context.strokeStyle = '#e53d37';
context.stroke();
</script>
Drawing Semicircle
Like we used arc() method to create a circle, we can also create semicircle using the same method, but with a slight change in the PI value.
<canvas id="semiCircle" width="500" height="250"></canvas>
<script>
var canvas = document.getElementById('semiCircle');
var context = canvas.getContext('2d');
context.beginPath();
var center_X = canvas.width / 2;
var center_Y = canvas.height / 2;
var radius = 80;
context.arc(center_X, center_Y, radius, 0, Math.PI, false);
context.closePath();
context.lineWidth = 8;
context.fillStyle = '#0b930a';
context.fill();
context.strokeStyle = '#e53d37';
context.stroke();
</script>


