Ansible is an open-source IT automation tool used to automate configuration management, provisioning, application deployment, orchestration, and many other IT processes without the need to install any agents on the client nodes. It relies on SSH protocol to communicate with the client nodes. Ansible provides ease of use and installation when compared to other similar tools such as puppet, chef, terraform etc., In this tutorial, we shall learn how to install Ansible on CentOS 8 Linux and configure it.
Install Ansible on CentOS 8 Linux
Step 1: Install and Enable EPEL repository
[root@install-ansible ~]# dnf install epel-release -y
Step 2: Download the remote index of packages to the local file cache to speed up subsequent dnf commands.
[root@install-ansible ~]# dnf makecache
CentOS Linux 8 - AppStream 2.6 kB/s | 4.3 kB 00:01
CentOS Linux 8 - BaseOS 2.6 kB/s | 3.9 kB 00:01
CentOS Linux 8 - Extras 1.0 kB/s | 1.5 kB 00:01
Extra Packages for Enterprise Linux 8 - x86_64 8.7 kB/s | 11 kB 00:01
Extra Packages for Enterprise Linux Modular 8 - x86_64 9.6 kB/s | 10 kB 00:01
Remi's Modular repository for Enterprise Linux 8 - x86_64 501 B/s | 833 B 00:01
Safe Remi's RPM repository for Enterprise Linux 8 - x86_64 802 B/s | 833 B 00:01
Metadata cache created.
Step 3: Install Ansible
[root@install-ansible ~]# dnf install ansible -y
Last metadata expiration check: 0:02:17 ago on Tue 01 Mar 2022 10:28:48 AM IST.
Dependencies resolved.
=============================================================================================================================================================
Package Architecture Version Repository Size
=============================================================================================================================================================
Installing:
ansible noarch 2.9.27-1.el8 epel 17 M
Installing dependencies:
python3-bcrypt x86_64 3.1.6-2.el8.1 epel 44 k
python3-jmespath noarch 0.9.0-11.el8 appstream 45 k
python3-pyasn1 noarch 0.3.7-6.el8 appstream 126 k
python3-pynacl x86_64 1.3.0-5.el8 epel 100 k
sshpass x86_64 1.06-9.el8 epel 27 k
Installing weak dependencies:
python3-paramiko noarch 2.4.3-1.el8 epel 289 k

Transaction Summary
=============================================================================================================================================================
Install 7 Packages
Installed:
  ansible-2.9.27-1.el8.noarch          python3-bcrypt-3.1.6-2.el8.1.x86_64    python3-jmespath-0.9.0-11.el8.noarch    python3-paramiko-2.4.3-1.el8.noarch
  python3-pyasn1-0.3.7-6.el8.noarch    python3-pynacl-1.3.0-5.el8.x86_64      sshpass-1.06-9.el8.x86_64

Complete!
Step 4: Verify the installation of ansible
[root@install-ansible ~]# ansible --version
ansible 2.9.27
config file = /etc/ansible/ansible.cfg
configured module search path = ['/root/.ansible/plugins/modules', '/usr/share/ansible/plugins/modules']
ansible python module location = /usr/lib/python3.6/site-packages/ansible
executable location = /usr/bin/ansible
python version = 3.6.8 (default, Sep 10 2021, 09:13:53) [GCC 8.5.0 20210514 (Red Hat 8.5.0-3)]
Configure Ansible on CentOS 8
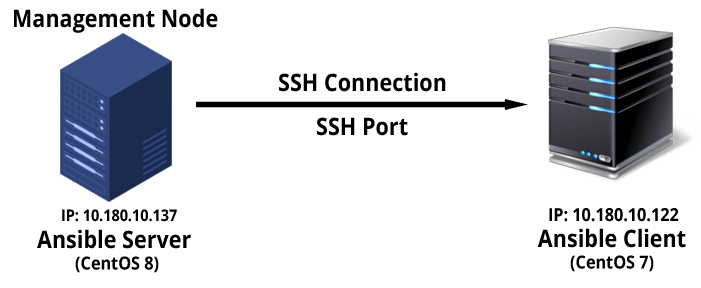
Consider the below architecture for this tutorial. You can extend the same to n number of clients.
Step 5: Open /etc/hosts file on ansible-server
In this article, we shall use /etc/hosts file for DNS name resolution of the clients IP Addr.
[root@ansible-server ~]# vim /etc/hosts
Add the below entries on Ansible client IP address and hostname
10.180.10.122 ansible-client
Setup SSH Passwordless Authentication
Step 6: Generate SSH keys on Ansible Server (Management Node) without being prompted for a passphrase.
[centos@ansible-server ~]$ ssh-keygen -f id_rsa -t rsa -N ''
Generating public/private rsa key pair.
Your identification has been saved in id_rsa.
Your public key has been saved in id_rsa.pub.
The key fingerprint is:
SHA256:vqvgSILGrVxCDsLuORbJojxiYDEFEFlNQi5ZrHeqYhE centos@ansible-server
The key's randomart image is:
+---[RSA 3072]----+
|+B*o.            |
|.+.o.            |
|o.o              |
|oE. .            |
|++=o    S        |
|@*o    .         |
|OB+o.   .        |
|OX=o .   .       |
|*=+ . ..o.       |
+----[SHA256]-----+
Step 7: Copy the SSH keys to Ansible Client
[centos@ansible-server ~]$ ssh-copy-id centos@ansible-client
/usr/bin/ssh-copy-id: INFO: Source of key(s) to be installed: "/home/centos/.ssh/id_rsa.pub"
The authenticity of host 'ansible-client (10.180.141.122)' can't be established.
ECDSA key fingerprint is SHA256:oDKa1jiDVmPzHmD0HqKr5v10xhalFVbklrdudxAFx5M.
Are you sure you want to continue connecting (yes/no/[fingerprint])? yes
/usr/bin/ssh-copy-id: INFO: 1 key(s) remain to be installed -- if you are prompted now it is to install the new keys
centos@ansible-client's password:

Number of key(s) added: 1

Now try logging into the machine, with: "ssh 'centos@ansible-client'"
and check to make sure that only the key(s) you wanted were added.
Step 8: Verify Passwordless connection
[centos@ansible-server ~]$ ssh centos@ansible-client
Last login: Tue Mar 1 05:57:15 2022 from 10.180.6.115
[centos@ansible-client ~]$
Step 9: Sudo access for centos user on ansible-client
Make sure, the centos user on ansible-client has sudo access without a password. This helps ansible to run any root commands on ansible-client using centos user.
# visudo

## Add the below content
centos ALL=(ALL) NOPASSWD:ALL
Now the ansible-client is ready to be managed from ansible-server (Management Node) using the centos user on ansible-client.
How to use Ansible
Step 10: Create Ansible Inventory
Ansible keeps a list of all the remote client’s information it manages in a file called inventory file. Ansible inventory file is just a simple plain text file and the default file location is: /etc/ansible/hosts
[centos@ansible-server ~]$ mkdir ~/ansible
[centos@ansible-server ~]$ cd ~/ansible
[centos@ansible-server ansible]$ vim hosts
Add all the ansible client’s entry
ansible-client ansible_user=centos
10.180.10.122 ansible_user=centos
[centos]
ansible-client ansible_user=centos
Step 11: List all the hosts from the inventory file
[centos@ansible-server ansible]$ ansible -i hosts --list-hosts all
  hosts (1):
    ansible-client
Step 12: Verify the hosts are active
[centos@ansible-server ansible]$ ansible -i hosts -m ping all
ansible-client | SUCCESS => {
"ansible_facts": {
"discovered_interpreter_python": "/usr/bin/python"
},
"changed": false,
"ping": "pong"
}
Step 13: Run commands on the remote ansible-client (all/groupname based)
[centos@ansible-server ansible]$ ansible -i hosts -m shell -a "more /etc/redhat-release" ansible-client
ansible-client | CHANGED | rc=0 >>
CentOS Linux release 7.8.2003 (Core)
That’s it! Now start managing your remote clients using ansible in your own ways.
Ansible Playbook helps to manage your servers more easily by making complex IT actions executed with limited or no human involvement. We shall try to cover Ansible Playbook in our next article.


