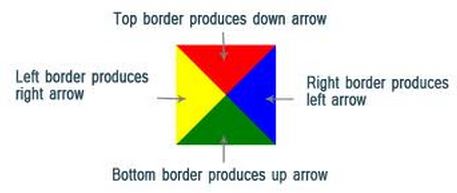
As a web developer, you might want to create triangles or arrows for your website. There are couple of ways to achieve this; first option is to use images and the second one using CSS. Unlike images, CSS is lightweight and it’s quite simple to use. Today we’ll see how to create Up, Down, Left and Right arrows using pure CSS.
For example, if you want to create an arrow pointing upwards, then you have three sides; the bottom, left and right. The idea is to use borders on HTML element (I’ll use div for demo); where the borders meet each other at angles. So making one as transparent and the other non-transparent will bring up a triangle. It means, you can easily adjust different borders and set height/width to get different shapes pointing in different directions.
Let’s create now..
Create Up Arrow using CSS
Copy and paste the below code inside body tag
<div class="arrUp"></div></pre>
Copy and paste the below CSS under style tag
 .arrUp {
        width: 0;
        height: 0;
        border-left: 60px solid transparent;
        border-right: 60px solid transparent;

        border-bottom: 60px solid #01a7da;
}
Create Down Arrow using CSS
Copy and paste the below code inside body
<div class="arrDown"></div>
Copy and paste the below CSS under style tag
 .arrDown {
        width: 0;
        height: 0;
        border-left: 60px solid transparent;
        border-right: 60px solid transparent;

        border-top: 60px solid #dd5b25;
}
Create Left Arrow using CSS
Copy and paste the below code inside body
<div class="arrLeft"></div>
Copy and paste the below CSS under style tag
 .arrLeft {
        width: 0;
        height: 0;
        border-top: 60px solid transparent;
        border-bottom: 60px solid transparent;

        border-right:60px solid #bb0000;
}
Create Right Arrow using CSS
Copy and paste the below code inside body
<div class="arrRight"></div>
Copy and paste the below CSS under style tag
 .arrRight {
        width: 0;
        height: 0;
        border-top: 60px solid transparent;
        border-bottom: 60px solid transparent;

        border-left: 60px solid #4b830b;
}


