Question:
I have installed KVM hypervisor on my Debian Guest OS (basically a nested virtualization) which is hosted on a Ubuntu machine. However, when I run the kvm command, I get this error – “Could not access KVM kernel module: No such file or directory. failed to initialize KVM: No such file or directory. No accelerator found“. I use virt-manager on the host machine to manage the guest OSes. Can you tell me, how to solve this error?
Solution:
If you want to run a Virtualization on a Guest machine, then you need to ensure that the host machine is supporting Nested Virtualization. The below command will allow you to find if the host machine supports Nested virtualization.
How to find if Intel or AMD machines support nested virtualization?
On AMD architecture:
[Host]$ sudo cat /sys/module/kvm_amd/parameters/nested
 1
On Intel architecture:
[Host]$ sudo cat /sys/module/kvm_intel/parameters/nested
If the output of the above command is ‘Y’ or ‘1’, then your host machine supports nested Virtualization.
In case, if your host machine does have nested virtualization enabled, then you need to enable it first.
On AMD architecture:
sudo rmmod kvm-amd
sudo sh -c "echo 'options amd nested=1' >> /etc/modprobe.d/dist.conf"
sudo modprobe kvm-amd
On Intel architecture:
cat /etc/modprobe.d/dist.conf
options kvm-amd nested=y
Once done, reboot the host machine.
Now, configure virt-manager to support nested virtualization.
1. Launch virt-manager.
$ virt-manager
2. Start your virtual machine.
3. Double clicking the virtual machine name will open a window as shown below.
4. Click View > Details.
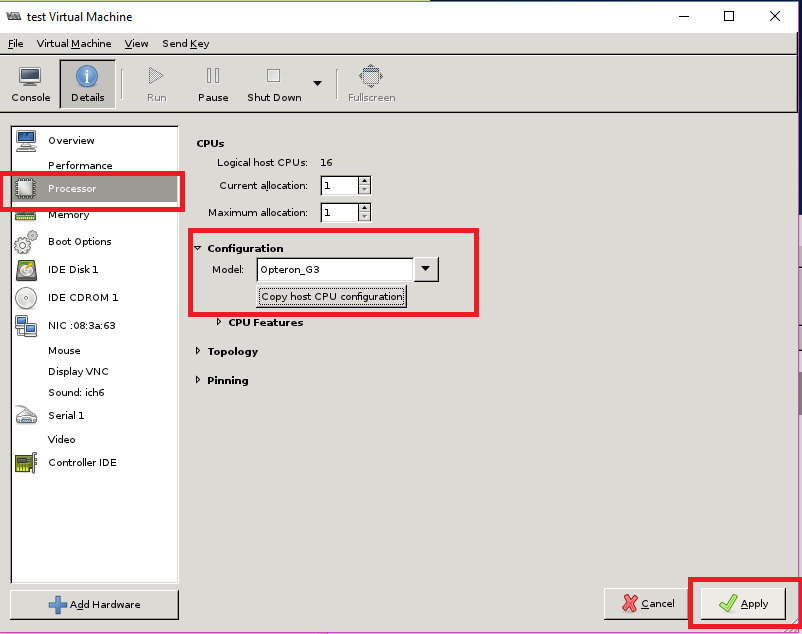
5. In the Details window, click on Processor.
6. Under Configuration, click on “Copy host CPU configuration“. Once done, the Model field will be populated automatically.
7. Click Apply button at the bottom.
Note: These changes will take effect after the next guest shutdown.
8. Shutdown your VM and start again.
9. Try executing kvm command and it should work.


