
Followed your article to create a Windows Image for OpenStack glance repository. After successfully booting of VM, found the size of the qcow2 image is 20GiB.
# ls -lrth win10.qcow2
-rw-------. 1 qemu qemu 21G Dec 9 13:45 win10.qcow2
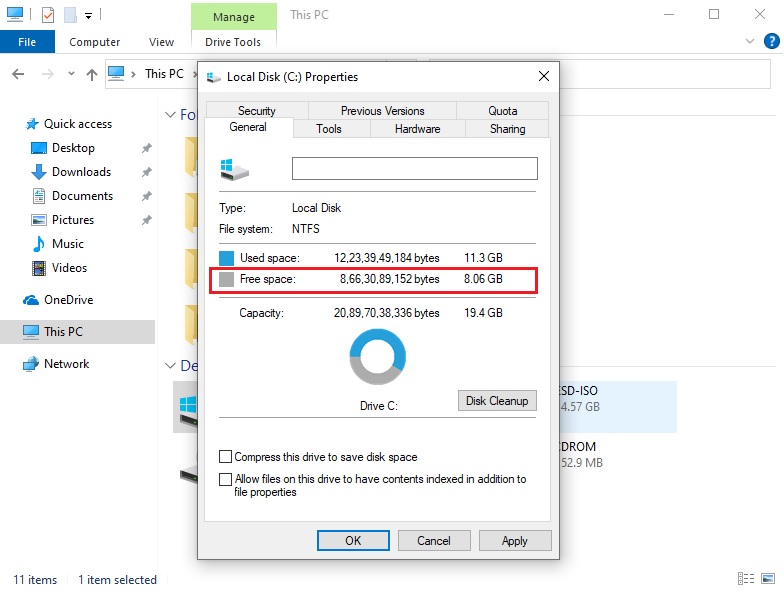
However, there is a lot of free space available on the C: drive which makes the Windows Image FAT, increases the glance repository storage and while booting of the VM, it adds up to the bandwidth and network latency.
Also qcow2 images are supposed to be thin-provisioned and if I checked the actual space used by the disk image with a tool that is thin provisioning aware like du, still I get the same size.
# du -h win10.qcow2
21G win10.qcow2
QEMU provides disk image utility to know the real size used by the image on Host device format. It also provides the same size!
# qemu-img info win10.qcow2
image: win10.qcow2
file format: qcow2
virtual size: 20 GiB (21474836480 bytes)
disk size: 20 GiB
cluster_size: 65536
Format specific information:
compat: 1.1
lazy refcounts: true
refcount bits: 16
corrupt: false
Shrink qcow2 Windows VM image
Step 1: Backup your qcow2 image to a safer location
# cp /var/lib/libvirt/images/win10.qcow2 /root/
Step 2: Re-claim the empty disk space using virt-sparsify
The virt-sparsify command-line tool can be used to make a virtual machine disk (or any disk image) sparse. This is also known as thin-provisioning. Free disk space on the disk image is converted to free space on the host. The virt-sparsify command can work with most filesystems, such as ext2, ext3, ext4, btrfs, NTFS. It also works with LVM physical volumes. virt-sparsify can operate on any disk image, not just virtual machine disk images.
Sparsify a disk image in place using the below command:
# virt-sparsify --in-place win10.qcow2
◓ 25% ⟦▒▒▒▒▒▒▒▒▒▒▒▒▒▒▒▒▒▒▒▒▒▒▒▒▒▒▒▒▒▒▒▒▒▒▒▒▒▒▒▒▒▒▒▒▒▒▒▒▒▒▒▒▒▒▒═══════════════════════════════════════════════════════════════════════════════════════════════════════════════════════════════════════════════════════════════════════⟧ --:--
100% ⟦▒▒▒▒▒▒▒▒▒▒▒▒▒▒▒▒▒▒▒▒▒▒▒▒▒▒▒▒▒▒▒▒▒▒▒▒▒▒▒▒▒▒▒▒▒▒▒▒▒▒▒▒▒▒▒▒▒▒▒▒▒▒▒▒▒▒▒▒▒▒▒▒▒▒▒▒▒▒▒▒▒▒▒▒▒▒▒▒▒▒▒▒▒▒▒▒▒▒▒▒▒▒▒▒▒▒▒▒▒▒▒▒▒▒▒▒▒▒▒▒▒▒▒▒▒▒▒▒▒▒▒▒▒▒▒▒▒▒▒▒▒▒▒▒▒▒▒▒▒▒▒▒▒▒▒▒▒▒▒▒▒▒▒▒▒▒▒▒▒▒▒▒▒▒▒▒▒▒▒▒▒▒▒▒▒▒▒▒▒▒▒▒▒▒▒▒▒▒▒▒▒▒▒▒▒▒▒▒▒▒▒▒▒▒▒▒▒▒▒▒▒▒⟧ 00:00
[ 18.9] Trimming /dev/sda1
[ 19.1] Trimming /dev/sda2
[ 19.8] Trimming /dev/sda3
[ 20.2] Sparsify in-place operation completed with no errors
Step 3: Check the images real size on Host device using qemu-img and du
# qemu-img info win10.qcow2
image: win10.qcow2
file format: qcow2
virtual size: 20 GiB (21474836480 bytes)
disk size: 12.2 GiB
cluster_size: 65536
Format specific information:
compat: 1.1
lazy refcounts: true
refcount bits: 16
corrupt: false

# du -h win10.qcow2
13G win10.qcow2
How to decrease a KVM Virtual Machine Disk Size?
We saw there are two fields that show the size: virtual size and disk size.
- Virtual Size – is the size of a virtual disk set when creating a VM
- Disk Size – is the current size of the disk file. i.e., how much space the disk occupies on a physical server (applies only to the qcow disk format).
Step 1: Create a new, smaller disk image.
# qemu-img create -f qcow2 win10-new.qcow2 13G
Step 2: Use the virt-filesystems command to discover filesystems, partitions, logical volumes, and their sizes in a disk image or virtual machine.
# virt-filesystems -a win10.qcow2 -lh
Name       Type        VFS   Label            Size  Parent
/dev/sda1  filesystem  ntfs  System Reserved  50M   -
/dev/sda2  filesystem  ntfs  -                19G   -
/dev/sda3  filesystem  ntfs  -                498M  -
The /dev/sda2 partition contains the Windows files and that is of 20GiB!
Step 3: Follow the guide to delete the Windows Recovery Partition.
Step 4: Follow the guide to expand the active Windows 10 partition system.
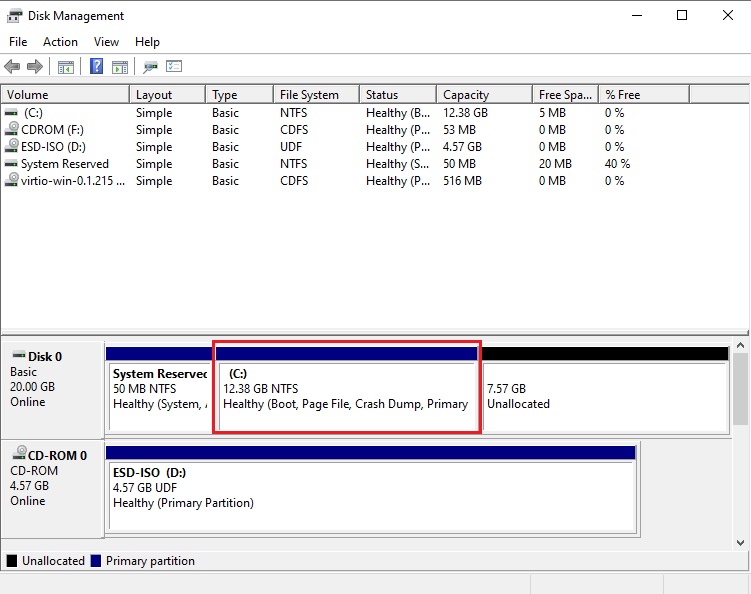
Step 5: Shrink the active Windows 10 partition volume.
Right-click on the active Windows 10 partition,click on Shrink Volumeand follow the windows.
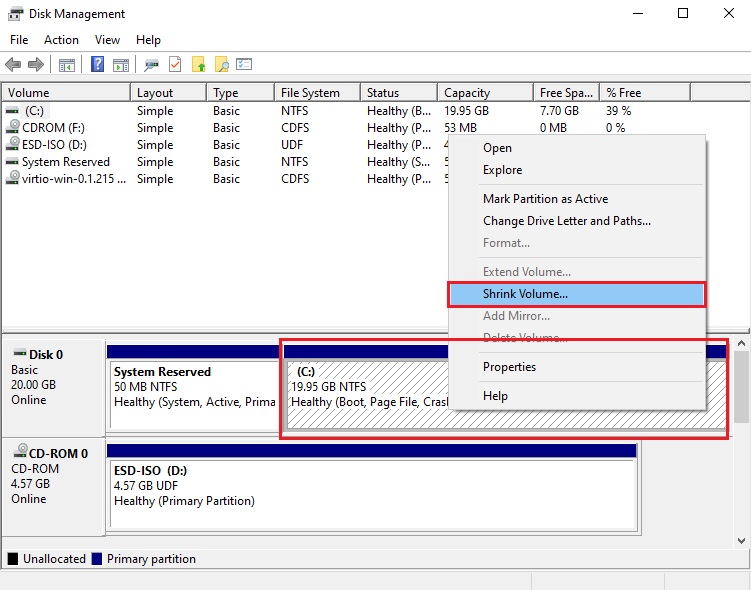
Now the active windows 10 partition would be of lesser size.
Step 6: Shutdown the VM.
Step 7: Now use the virt-filesystems command to discover filesystems, partitions, logical volumes, and their sizes in a disk image or virtual machine.
# virt-filesystems -a win10.qcow2 -lh
Name       Type        VFS   Label            Size  Parent
/dev/sda1  filesystem  ntfs  System Reserved  50M   -
/dev/sda2  filesystem  ntfs  -                12G   -
Step 8: Copy only the /dev/sda2 partition from the old image (win10.qcow2) to new image (win10-new.qcow2)
# virt-resize --expand /dev/sda2 win10.qcow2 win10-new.qcow2
[   0.0] Examining win10.qcow2
**********

Summary of changes:

/dev/sda1: This partition will be left alone.

/dev/sda2: This partition will be resized from 12.4G to 12.9G.  The
filesystem ntfs on /dev/sda2 will be expanded using the ‘ntfsresize’
method.

**********
[   5.2] Setting up initial partition table on win10-new.qcow2
[   6.9] Copying /dev/sda1
[   7.2] Copying /dev/sda2
 100% ⟦▒▒▒▒▒▒▒▒▒▒▒▒▒▒▒▒▒▒▒▒▒▒▒▒▒▒▒▒▒▒▒▒▒▒▒▒▒▒▒▒▒▒▒▒▒▒▒▒▒▒▒▒▒▒▒▒▒▒▒▒▒▒▒▒▒▒▒▒▒▒▒▒▒▒▒▒▒▒▒▒▒▒▒▒▒▒▒▒▒▒▒▒▒▒▒▒▒▒▒▒▒▒▒▒▒▒▒▒▒▒▒▒▒▒▒▒▒▒▒▒▒▒▒▒▒▒▒▒▒▒▒▒▒▒▒▒▒▒▒▒▒▒▒▒▒▒▒▒▒▒▒▒▒▒▒▒▒▒▒▒▒▒▒▒▒▒▒▒▒▒▒▒▒▒▒▒▒▒▒▒▒▒▒▒▒▒▒▒▒▒▒▒▒▒▒▒▒▒▒▒▒▒▒▒▒▒▒▒▒▒▒▒▒▒▒▒▒▒▒▒▒▒⟧ 00:00
 100% ⟦▒▒▒▒▒▒▒▒▒▒▒▒▒▒▒▒▒▒▒▒▒▒▒▒▒▒▒▒▒▒▒▒▒▒▒▒▒▒▒▒▒▒▒▒▒▒▒▒▒▒▒▒▒▒▒▒▒▒▒▒▒▒▒▒▒▒▒▒▒▒▒▒▒▒▒▒▒▒▒▒▒▒▒▒▒▒▒▒▒▒▒▒▒▒▒▒▒▒▒▒▒▒▒▒▒▒▒▒▒▒▒▒▒▒▒▒▒▒▒▒▒▒▒▒▒▒▒▒▒▒▒▒▒▒▒▒▒▒▒▒▒▒▒▒▒▒▒▒▒▒▒▒▒▒▒▒▒▒▒▒▒▒▒▒▒▒▒▒▒▒▒▒▒▒▒▒▒▒▒▒▒▒▒▒▒▒▒▒▒▒▒▒▒▒▒▒▒▒▒▒▒▒▒▒▒▒▒▒▒▒▒▒▒▒▒▒▒▒▒▒▒▒⟧ 00:00
[ 131.6] Expanding /dev/sda2 using the ‘ntfsresize’ method

Resize operation completed with no errors.  Before deleting the old disk,
carefully check that the resized disk boots and works correctly.
Step 9: Verify the size of the Image file.
# qemu-img info win10-new.qcow2
image: win10-new.qcow2
file format: qcow2
virtual size: 13 GiB (13958643712 bytes)
disk size: 11 GiB
cluster_size: 65536
Format specific information:
    compat: 1.1
    lazy refcounts: false
    refcount bits: 16
    corrupt: false

# ls -lrth win10-new.qcow2
-rw-r--r--. 1 root root 11G Dec 12 09:44 win10-new.qcow2

# du -h win10-new.qcow2
11G     win10-new.qcow2