There are times by mistake we delete critical data. Sometimes it happens accidentally, but when it happens, I know how it hurts. Recently I used the most dangerous command in Linux “rm -rf *” and then realized, it was a big mistake. There are plenty of data recovery tools in the market such as Testdisk, Photorec, Safecopy and ddrescue. So I didn’t loose my hope. But what’s disappointing is Testdisk was able to recover the filenames properly but with no contents, Photorec was not able recover “.php” files even after adding custom extension and you know Safecopy is a great tool to recover data from a corrupted hard disk (my case is to recover deleted files from a working HDD). I spent few hours with each of the above said tools, but failed to recover the data. Well, I am not questioning the functionality of those tools, as they have been handy to many users, but somehow I was not successful in making use of those. Finally I happened to use “Scalpel” data recovery or carving tool. Today I am going to share my experience with Scalpel.
Note: I’m not promoting Scalpel, but it worked for me. There is no guarantee Scalpel will recover your data, but at least you have a chance. So lets see how to use Scalpel to recover deleted files on Linux.
Scalpel is a fast file carving tool that reads a database of header and footer definitions and extracts matching files from a set of image files or raw device files. The tool will work on any linux platform including Debian, Ubuntu and RedHat based variants.
Step 1: If you are using Debian or Ubuntu, install it via apt-get.
apt-get install scalpelIf you are using RedHat based Linux,
yum install scalpelStep 2: Once the installation is done, try to locate scalpel configuration file as below.
Note: In case, if you don’t find the configuration file under /etc/scalpel, then try to search under /etc/. Once you are able to find the file, just create a folder named “scalpel” under /etc and move the file into it.
Step 3: Before using Scalpel, we have to tell the tool what type of files it should search for. For instance, whether PDF, JPG, PNG formats. You can define the required file format in /etc/scalpel/scalpel.conf. By default, all the file types are commented out.
Here, my case was to recover PHP files. So, I will have to add the file type manually as below,
php y 50000 <?php ?>Step 4: Create the destination directory to copy the restored files.
mkdir /mnt/tst/scalpelStep 5: Execute the Scalpel command to restore the files as below,
Note: Scalpel was not able to identify the configuration file on my machine, so i had to mention it explicitly using ‘-c’ option. It might not be required for everyone. “/dev/sda2” is the device that had my files.
The recovery process would take few hours depending upon the size of your device. For instance, it took one hour and 15 minutes to recover PHP files on a device that sized around 250GB.
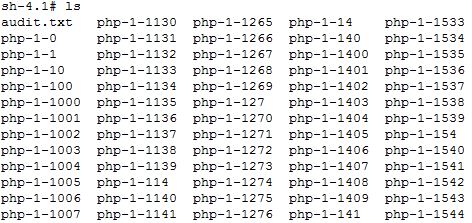
Step 6: Once the recovery process is completed, checkout the restoration folder. You will be surprised to see that the tool was not able to recover the original file names. For instance, in my case the restored files and folders looked as below,
But you have your content hiding somewhere in those directories. Now, I’ll have to do some digging into those recovered folders.
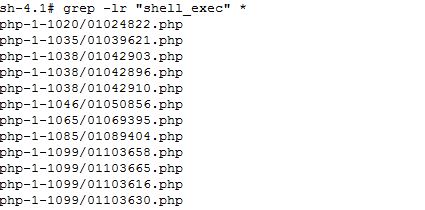
Step 7: Try to search for the text that you had coded in original files. For instance, I had used “shell_exec” function in my PHP files. So my grepping goes as below,
grep -lr "shell_exec" *Step 8: Open the matched files to verify the contents. There were many files that matched “shell_exec” pattern (as i have been using this server for the past three years and obviously I would have deleted plenty of PHP files), but that doesn’t matter as long as you are able find the right file. Finally, I was able to recover my PHP source files without data loss.
Hope, you could also recover from accidental deletes.


Thank you so much !! saved me hours of re-programming 😉