Have you deleted a file accidentally? Checkout this article, where you can find few data recovery tools for both Windows and Linux machines. Once I was in a situation to recover few PHP files that was deleted accidentally and with the help of my wife Maha, I was introduced to PhotoRec data recovery tool. PhotoRec supports almost 360 file extensions, but it doesn’t support .php file extension by default. It means, you will have to configure the tool to understand and recover .php files. Since PhotoRec 6.12, you can add your own custom signatures, which can be enabled in [File Opts] menu.
Here we go,
Step 1: Download TestDisk data recovery tool, which comes with PhotoRec.
Step 2: Extract the file downloaded in Step 1 and enter the directory.
Step 3: Run the executable ‘./photorec_static‘ located inside the extracted folder. Remember, you must be ‘root’ user to run this command.
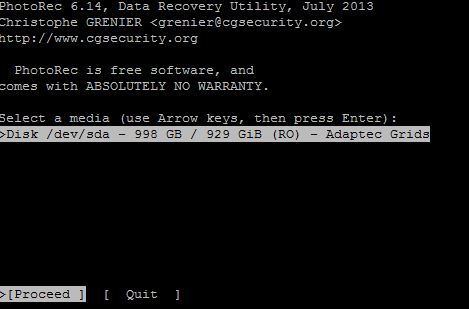
Step 4: Select the media using Up/Down arrows and hit enter when “Proceed” is selected.
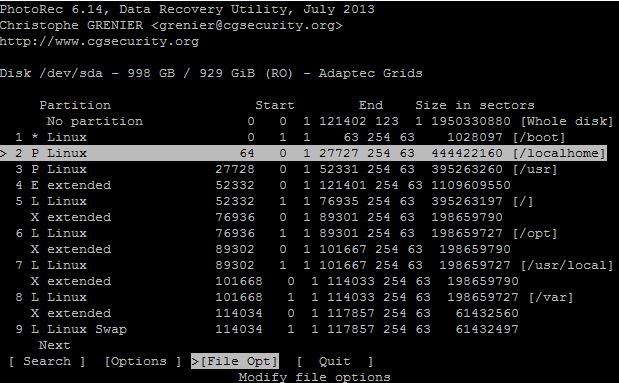
Step 5: Select the partition that you wish to recover the deleted file from. Using the Left/Right arrows, select [File Opt] option at the bottom of the screen.
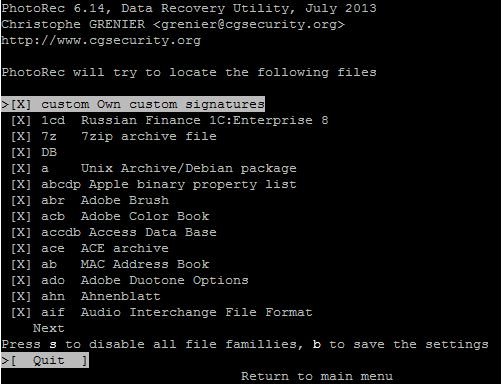
Step 6: In this screen you can select the file types that you wish to recover. In my case, php file type is not listed, but you can add it as custom extension. We’ll see how to do that.
Step 7: Select “custom Own custom signatures” option and hit ‘b’ to save the settings.
Step 8: Now open another terminal and ensure that you have ‘fidentify_static‘ file inside the extracted folder. (Performed in Step 1). This executable file will be used to check whether PhotoRec can detect a specific file format or not.
As you can see from the above image, PhotoRec is not able identify php file format.
Step 9: Also verify whether ‘.photorec.sig‘ exist in your Home directory. If you are a windows user, then ‘photorec.sig’ file exists in USERPROFILE or HOMEPATH. In case, if you don’t find one, just create it.
Step 10: ‘.photorec.sig’ should contain extension name, offset of the signature, signature or magic value. For instance, if you want the tool to search for .php files, then the extension name will be php. Offset of the signature and magic value will be generated using ‘hexdump‘ command.
Step 11: I want to search for .php files that contain text as ‘shell_exec’, so I am going to create one sample php file as below.
Step 12: Lets generate offset of the signature, magic or signature value and create ‘.photorec.sig’ file. To do that, run the below command.
hexdump -C sample.phpThe above command will output the offset of the signature and magic or signature value for the contents stored in sample.php as below,
Step 13: Open ‘.photorec.sig’ file created in Step 9 and add the below line (this will change in your case based on the contents in sample.php)
The format goes like this,
extension offset-of-the-signature magic or signature value
php 0 "shell_exec"Here, offset-signature is obtained from the first column of the output generated using hexdump command in Step 12. Magic value or signature is the last column of the output obtained using hexdump.
Step 14: Lets verify whether PhotoRec is able to recognize php extension using the below command.
./fidentify_static sample.php
That’s it! You have added a custom extension to PhotoRec. Now run the executable “photorec_static’ to recover your deleted files.
You might also check out this Scalpel, another powerful data recovery tool for Linux.


You should make a YouTube tutorial video on how to do that. Also, I’m not a Linux user btw.
Not enough detail on some of the steps, esp at the beginning – if you’re not an experienced Linux user, “extract and enter directory” is useless.
As it is a command line tool and not a GUI, the author expected a basic knowledge on Linux which includes an extract and entering into the directory.