Setting up an SSL certificate for WSO2 API Manager is not straightforward, as it requires creating Keystore and adding an SSL certificate to the Keystore. In this article, we will see how to set up WSO2 with Let’s Encrypt certificate.
I assume that you already have the Let’s Encrypt certificate issued and ready to add it to the WSO2 Keystores. If not, go ahead and get one for your domain. In my case, I had the NGINX server front-ending the WSO2 services, hence I had obtained Let’s Encrypt certificate using the certbot program for NGINX webserver.
$ sudo certbot --nginx -d tg.com -d www.tg.com
Once the certificate is issued, you will find .pem files under ‘/etc/letsencrypt/live/<domain_name>/‘ folder. Now copy the cert.pem and privkey.pem files to your home directory and follow the below steps.
How to setup WSO2 with Let’s Encrypt certificate?
Step 1: Create PKCS12/PFX file using the cert.pem and privkey.pem files.
We will use the OpenSSL command to export certificates to PKCS12/PFX format and secure it with a strong password when prompted.
$ openssl pkcs12 -export -in cert.pem -inkey privkey.pem -name "letsencrypt" -out letsencrypt.pfx
Step 2: Creating Java Keystore
Once you have the PFX file ready, create the Java Keystore using the below command.
$ keytool -importkeystore -srckeystore letsencrypt.pfx -srcstoretype pkcs12 -destkeystore letsencrypt.jks -deststoretype JKS
For the above command to work, you will need to have JDK installed (of course, you already have WSO2 Setup ready). The command keytool would be located inside bin directory of the JDK.
The above command will prompt for the password of both the source Keystore and the destination Keystore.
Step 3: Export the public key from the Java Keystore file.
WSO2 comes with the public trust store (client-truststore.jks) and this file needs to be updated with the public key of the JKS file created in step 2.
So let’s go ahead and export the public key from the letsencrypt.jks file. To do that, execute the below command.
$ keytool -export -alias "letsencrypt" -keystore letsencrypt.jks -file letsencrypt.pem
Step 4: Move letsencrypt.jks and letsencrypt.pem files to the following directory.
$ cp letsencrypt.jks letsencrypt.pem <WSO2_APIM>/repository/resources/security
Step 5: Add a public key to the client-truststore.jks
$ cd <WSO2_APIM>/repository/resources/security
$ keytool -import -alias letsencrypt -file letsencrypt.pem -keystore client-truststore.jks -storepass wso2carbon
Step 6: Configure the Keystore with WSO2 API Manager.
Configure the WSO2 API Manager with the new Keystore created in step 2. To do that, the following files need to be edited.
Some versions of WSO2 require carbon.xml file to be edited, but the latest versions need only the deployment.toml file to be changed (as the WSO2 managed to simplify the configuration model).
$ vi <WSO2_APIM>/repository/conf/carbon.xml
Lookout for <KeyStore> tag and replace it with the below.
<KeyStore>
<!-- Keystore file location-->
<Location>${carbon.home}/repository/resources/security/letsencrypt.jks</Location>
<!-- Keystore type (JKS/PKCS12 etc.)-->
<Type>JKS</Type>
<!-- Keystore password-->
<Password><Keystore password></Password>
<!-- Private Key alias-->
<KeyAlias>letsencrypt</KeyAlias>
<!-- Private Key password-->
<KeyPassword><Keystore password></KeyPassword>
</KeyStore>Change the deployment.toml file with the details of the new Keystore:
$vi <WSO2_APIM>/repository/conf/deployment.toml
[keystore.tls]
file_name = "letsencrypt.jks"
type = "JKS"
password = "<Keystore password>"
alias = "letsencrypt"
key_password = "<Keystore password>"
I suppose modifying deployment.toml should suffice. However, if things do not work straight away, you may edit the below files (probably required for the older versions of WSO2 API Manager).
$ cd <WSO2_APIM>/repository/conf/
$ grep -rn "*.jks"
Edit all the listed files with the relevant Keystore entries.
Now go ahead and restart the WSO2 server.
$ <WSO_APIM>/bin/api-manager.sh --restart
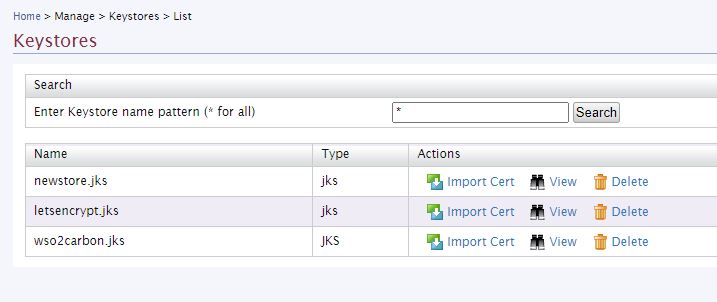
Step 7: Log in to the Carbon interface and check if the new Keystore is added successfully. Click Keystores > List.
Step 8: If you don’t find the Keystore, you can add it manually by clicking Keystores > Add.
That’s it! You will now see the green padlock next to the WSO2 URL in the browser address bar.
Still, have problems? You may need to look at the following references.


Hi. Thanks. That’s exactly what I was looking for.
As LetsEncript certificates are valid only for 3 months, Should I do it every time the certificate is renewed?