
Millions of beautiful websites and blogs are powered by WordPress due to its SEO friendly feature. Started off in 2003 with fewer users, today it has grown to be the largest self-hosted blogging tool in the world. Recently wordpress released version 3.8 and named it as “Parker” in honor of Charlie Parker, bebop innovator, is available for download. The new features of Parker are:
- Introducing a modern new design
- WordPress on every device
- Admin color schemes to match your personality
- Refined theme management
- Twenty Fourteen, a sleek new magazine theme
Click here to know more about this version of wordpress. In this article we shall learn how to install wordpress 3.8 on a Linux machine(CentOS/RHEL/Fedora).
Software Prerequisites
To install and run WordPress powered site/blog, you need to have the following packages already installed and configured.
- Apache
- MySQL (version 5.0 or greater)
- PHP (version 5.2.4 or greater)
- PHP5 module for Apache
Ensure all the above packages are installed using the below commands:
[root@catest ~]# yum info httpd
[root@catest ~]# yum info mysql
[root@catest ~]# yum info php
If any of them is missing, install using below commands through yum:
[root@catest ~]# yum install httpd
[root@catest ~]# yum install mysql
[root@catest ~]# yum install php
If your php version is still lesser than 5.2.4, follow “How to forcefully upgrade php from 5.1.6 to 5.3.3 using yum“. If you are installing php through source compilation and end up in xml2-config not found error, then follow this quick solution.
Install WordPress
step1: Download the latest WordPress tar-ball or zip file from the WordPress web site or run the below command:
[root@catest ~]# wget http://wordpress.org/latest.zip
Step 2: Decompress the downloaded file on to document root of your domain and update permissions on files
[root@catest html]# unzip wordpress-3.8.zip
[root@catest html]# chown -R apache:apache wordpress
[root@catest html]# chmod -R 755 wordpress
Step 3: Create a database and database user
Login to mysql with root user.
[root@catest html]# mysql -u root -p
Enter password:
Issue following mysql commands to create a database named my_wordpress.
mysql> CREATE DATABASE wordpress CHARACTER SET utf8;
Query OK, 1 row affected (0.73 sec)
Set username and password for the above created database using the below mysql command. Replace USERNAME with your username and PASSWORD with your password.
mysql> GRANT ALL PRIVILEGES ON wordpress.* TO 'YOUR_USERNAME'@'localhost' IDENTIFIED BY 'YOUR_PASSWORD';
Then flush the privileges
mysql> FLUSH PRIVILEGES;
Step 4:Create Configuration file for wordpress
If your PHP installation is missing MySQL extension, then accessing wordpress directory through web browser for first time would result in “Your PHP installation appears to be missing the MySQL extension which is required by WordPress” error. Follow the link for the quick solution.
After quickly solving the above issue, access wordpress folder through web browser for further installation process and you would end up in the below warning.
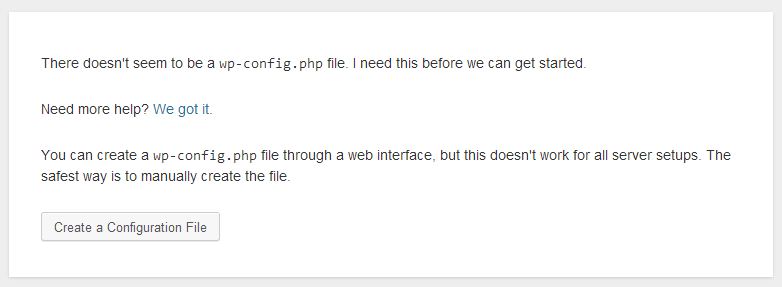
Even if you could configure wordpress configuration file through web interface, i would personally suggest to do it manually by copying wp-config-sample.php to wp-config.php under your wordpress directory as shown below.
[root@catest wordpress]# cp wp-config-sample.php wp-config.php
Open wp-config.php using your favorite editor.
[root@catest wordpress]# vim wp-config.php
Locate the following lines, and replace the values with the one created using step3.
/** The name of the database for WordPress */
define('DB_NAME', 'database_name_here');

/** MySQL database username */
define('DB_USER', 'username_here');

/** MySQL database password */
define('DB_PASSWORD', 'password_here');
Step 5:Now access wordpress directory using web browser
You would be prompted to fill in some information like Site Name, Username, Password, email etc., as shown below:

Important Note: Make sure your email address is entered properly. In case of lost password, you can retrieve the password to this email id.
Fill in all the details and press Install WordPress button.
Step6: That’s it WordPress has been successfully installed.

Step7: Login to wordpress administration page
Click on the login button and provide your username and password to login to the wordpress admin page.

Given all the pre-requisites installed wordpress installation would be in just under 5 minutes!!! By default “Twenty Fourteen” theme would be enabled. Default wordpress installation is prone to security hacks more. Follow this “Definitive guide to Secure your Web Server with 50 Best Practices” and make your web server tough to the hackers.
Let me know if this installation took you more than 5 mins???
