You might have read my article on How to Create Windows image for OpenStack and its related articles such as fixing Windows could not parse or process the unattended answer file for Pass Specialize, and How to configure Windows VM Autologin for OpenStack Cloud. To add to the series, here I encountered another issue. ie., Windows 10 VM shows 100% CPU utilization always on QEMU-KVM, making the VM unusable.
Setup Info
KVM Version: 4.2.0
Guest OS: Windows10 Home VM with 8vCPUs
HOST CPU: AMD Opteron(TM) Processor 6212 with
- CPU model: x86_64
- CPU(s): 32
- CPU frequency: 2593 MHz
- CPU socket(s): 1
- Core(s) per socket: 32
- Thread(s) per core: 1
- NUMA cell(s): 1
- Memory size: 65633412 KiB
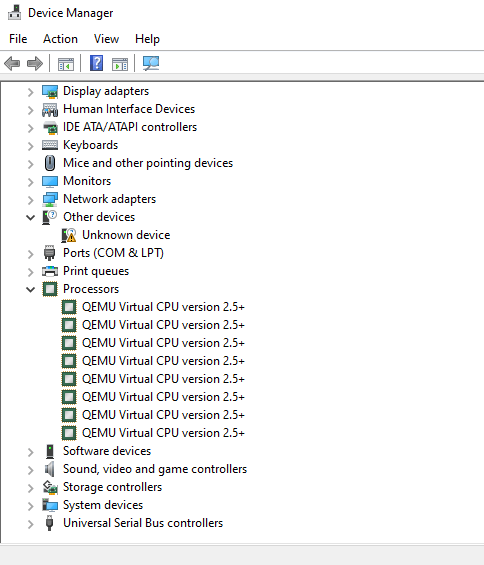
However, Windows detected this vCPUs as separate processors (not cores) and it could use only 1 of them as shown below:
Issue
Open Windows Device Manager and navigate to Processors to make sure it has allocated 8 vCPUs that we had assigned to the guest OS.
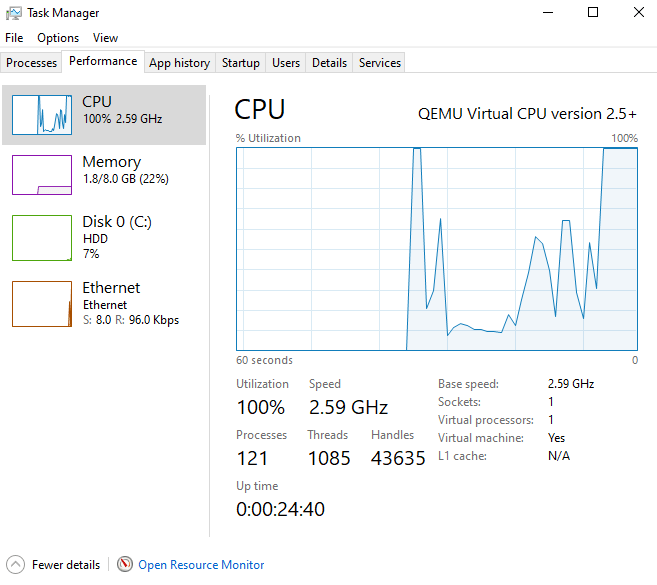
At the same time, both the Windows 10 Properties and the task manager show as only 1 QEMU virtual Processor is available.
Explanation
It means that Windows 10 is able to use only 1 core no matter how many of them you have on the processor.
Number of Processors Support in Windows
The problem is that the desktop version of Windows has a restriction on the maximum number of physical processors (sockets) a computer can use
- Windows 10 Home – 1 CPU
- Windows 10 Professional – 2 CPU
- Windows 10 Workstation – up to 4 CPU
- Windows Server 2016 – up to 64 CPU
However, this restriction is not related to the number of cores. In order to improve the performance of the Virtual Machine, you can use a processor with more cores.
Solution
Managing Virtual Core & vCPU in QEMU-KVM
In KVM Hypervisor running Windows 10 VM, all assigned virtual cores are considered as separate processors. To use all CPU resources allocated to a Virtual Machine, it must see one 8 core processor. KVM hypervisor allows the user to set the number of virtual cores used by each virtual machine.
Shutdown the Virtual Machine (win10 is the name of the VM)
# virsh shutdown win10
Edit the XML configuration of the KVM VM
# virsh edit win10
Output:
<domain type='kvm'>
<name>win10</name>
<uuid>3b4b8a6c-bf72-4cf8-8c63-fd7b5edf6784</uuid>
<metadata>
<libosinfo:libosinfo xmlns:libosinfo="http://libosinfo.org/xmlns/libvirt/domain/1.0">
<libosinfo:os id="http://microsoft.com/win/10"/>
</libosinfo:libosinfo>
</metadata>
<memory unit='KiB'>8388608</memory>
<currentMemory unit='KiB'>8388608</currentMemory>
<vcpu placement='static'>8</vcpu>
<os>
<type arch='x86_64' machine='pc-q35-rhel8.2.0'>hvm</type>
<boot dev='hd'/>
</os>
<features>
<acpi/>
<apic/>
<hyperv>
<relaxed state='on'/>
<vapic state='on'/>
<spinlocks state='on' retries='8191'/>
</hyperv>
<vmport state='off'/>
</features>
....
....
Add the following block after </features>
<cpu mode='host-passthrough' check='none'>
<topology sockets='1' cores='8' threads='1'/>
</cpu>
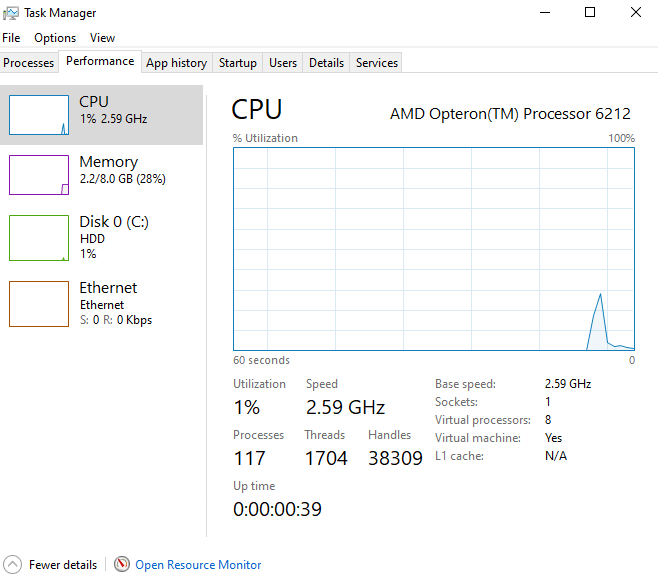
Save the configuration file and start the VM. Now login to Windows 10 guest VM and make sure that the Windows sees all allocated virtual cores in Task manager as below.


The article was helpful, one improvement I would suggest is in the screenshots of windows task manager where you are showing the number of virtual processors being 1 and then 8, it would help to hilite those values. It wasn’t obvious and it took me a while to understand what you were trying to show in the screenshots. in any event, the information in this article is useful and thank you for taking the time to write it.
This was useful, thank you!
Oye amigo muchas gracias, tenia tu mismo problema. me facilitaste la vida mucho (Spanish) – Hey man, thanks a lot, I had the same problem. You made my life a lot easier.