WordPress is an amazing platform to build your website or a blog. It’s powerful, easy to install, loaded with features, active community, millions of plugins etc…But…it’s also the platform loved by hackers. You can install WordPress in just 2 minutes, but your job should not stop there. There are plenty of things to do after installing WordPress – it ranges from security, SEO, accessibility, performance, customization etc…Let me share what I learned over the years with WordPress and the outcome is, 50 things that you should do after installing WordPress.
Note: I’ll be using WordPress version 4.2.2 for all the below tips. However, it’s advised to confirm compatibility with other WordPress versions. I also assume that the WordPress is running on a Linux operating system with Apache HTTP server.
Here are those!
Download Free ebook on WordPress Optimization, SEO and Security
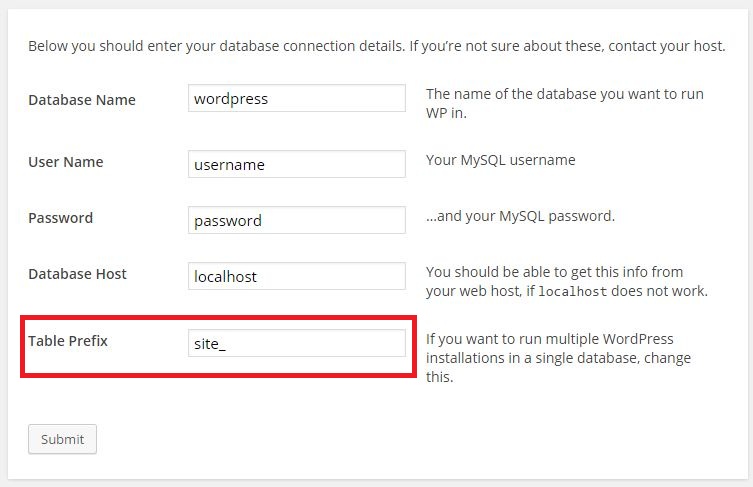
1. Change WordPress table prefix (during install)
Every information on your site is going to be stored in a WordPress database thus making it hacker’s favorite target. Hence it’s very important to change the default table prefix (wp_) to something else, because the spammers and hackers out there knows what the default table prefix is (wp_) and that allows them to perform SQL injection kind of attacks. Unfortunately, many people would install WordPress with default settings which include default database prefix. This would lead for hackers to plan a mass attack by targeting the default prefix wp_.
It’s always advised to change the prefix while you install WordPress, thus making a smartest way to protect your database.
Note: If you are planning to change the table prefix after installing the WordPress, then here’s the guide.
2. WordPress database need not be called as ‘wordpress’ or ‘wp’ (during install)
WordPress database need not be called as ‘wordpress’ or ‘wp’. It’s a good practice to create database with unique name and avoid using ‘wordpress‘ or ‘wp‘ or your website name, thus protecting your site by mere hiding these details from the bots and the lazy hackers. This is security by obscurity.
3. Don’t create username as ‘admin’
The hackers will love the default usernames! Don’t create a WordPress account with default username as ‘admin’ or any other common username. The hackers have a huge collection of common username and password, which is later used for Brute force method to attack wordpress blogs. Recently, a security firm reported that more than ninety thousand wordpress sites has been attacked using Brute force method. It’s highly recommended to change your default usernames. You can also change the default username on existing WordPress installations by following few simple steps listed below:
Note: Avoid using Author’s original name as usernames.
4. Install coming soon plugin while you do development at the backend
This point might surprise many, but it’s really important. Whether you are launching a new website or if you are carrying out some developmental activities, or simply performing a bit of routine maintenance, then you may not want to leak certain information to the public. These are the times coming soon page can come in real handy. For example, if you look at the HTML source of the default theme, you will find certain unwanted Meta tags added by WordPress – leaking version information and an archive page with a default “Hello World” post displaying the username of the published account (mostly the first account that you created during the installation). So until you remove all those (just keep scrolling down to see how), it’s better to install a coming soon plugin through which you can create a landing page or coming soon page in as little as 5 minutes without any programming or design skills.
Tips: You don’t need a lot of crazy features to get a nice landing page or coming soon page. Keep your landing page or coming soon page with a narrowly focused message.
5. Display name should not be username
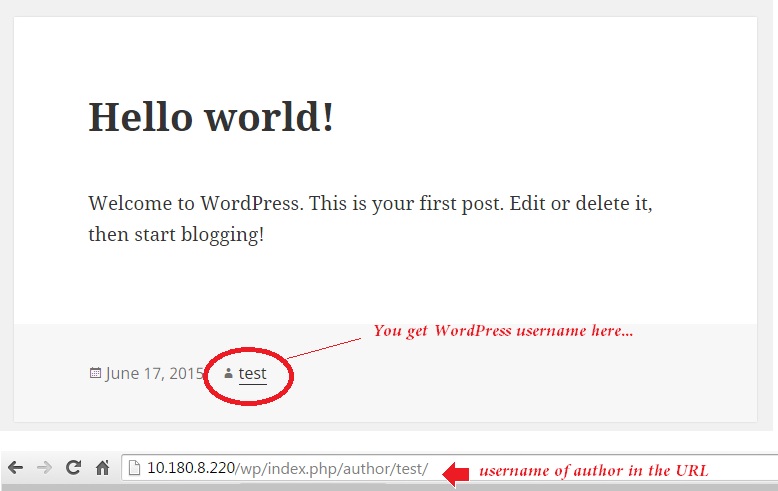
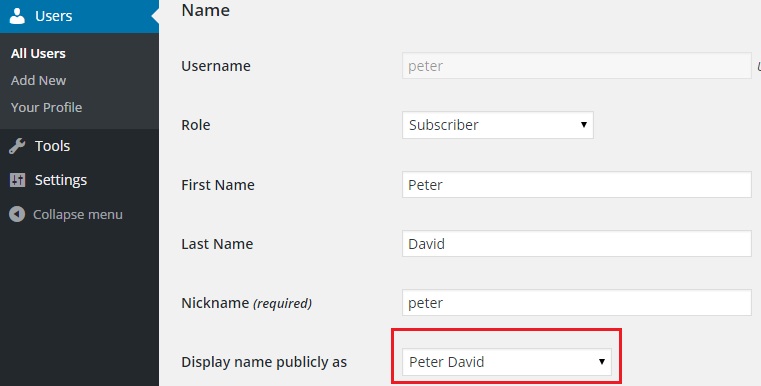
By default username is set as display name and that’s seen in author URL as well. For example, have a look at the below snapshot and you will see the circled word ‘test‘, which is a WordPress account that posted the article. Using the username as display name is something that I’m not a fan of.
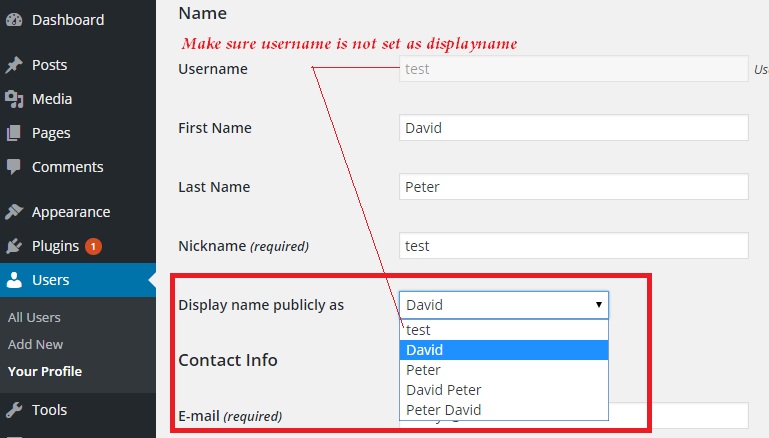
To change that, click Users > All Users and click Edit to access the user profile to change the display name.
But you have to do this on every user profile and it’s not going to stop if the site allows users to register – because the WP is going to set the username as Display name automatically.
To change the default display name for new registrations, copy and paste the below code in functions.php
function change_display_name( $user_id ) {
 $info = get_userdata( $user_id );
 $args = array(
 'ID' => $user_id,
 'display_name' => $info->first_name . ' ' . $info->last_name
 );
 wp_update_user( $args );
}
add_action('user_register','change_display_name');
Above code credits
Once the above code is added in functions.php, try creating a new user and you should see ‘Display name publicly as‘ set to ‘First and Last name‘ of the user.
Ok, but there is a catch here – What if the user changes his Display name?
You can simply disable the ‘Display name publicly as‘ field from Profile page and prevent user from changing it. To do that, copy and paste the below code in functions.php
function disable_display_name() {
    global $pagenow;
    if ( $pagenow == 'profile.php' ) {
    ?>
        <script>
            jQuery( document ).ready(function() {
                jQuery('#display_name').prop('disabled', 'disabled');
            });
        </script>
    <?php
    }
}
add_action( 'admin_head', 'disable_display_name', 15 );
6. Disable Plugin and Theme Editor in wp-admin
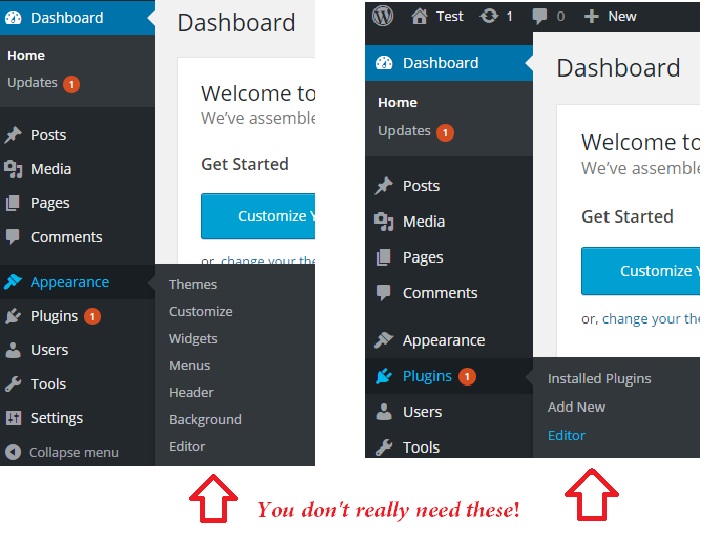
When you login to WP as admin, you’ll find “Editor” link under Appearance and Plugin menus. The WordPress file editor can be a great tool because it allows you to edit PHP files associated with the theme and plugins on your site directly from the WordPress administration area. Mostly administrators utilize this tool to edit their theme’s style.css file in order to make tweaks to their site. This can be a blessing in disguise. Basically, this is a potential backdoor to your server. The problem with the WordPress file editor is that it allows users to run PHP code on your site. Anytime a user is able to run their own code, this presents a security risk. If an insecure admin account is hacked, the WordPress file editor is the gateway through which a full-fledged attack can be carried out and also WordPress users can mess things up.
Note: If you still want to use it and it makes your life easier, take enough precautions with site security so that you are the only one who ever sees it.
To remove that, copy and paste the below line in wp-config.php
define( 'DISALLOW_FILE_EDIT', true );
7. Set Permalinks
Now set the permalinks via Settings > Permalinks. Permalinks are the permanent URLs for posts, pages and categories. It also plays a major role in WordPress SEO.
8. Disable XML-RPC
XML-RPC is enabled by default and it allows you to publish posts remotely (via WordPress app or Windows Live Writer), pingbacks, trackbacks and many other features. During early days, hackers used brute force attacks on WordPress login page. However, lately they are evolving and now leveraging the XMLRPC wp.getUsersBlogs method to guess as many passwords as they can. This attack is being made possible due to implementation of requiring username and password in XMLRPC calls. In these kind of attack, the hacker just inputs username and a password to the wp.getUsersBlogs call, which simply returns correct or not.
<methodCall><methodName>wp.getUsersBlogs</methodName><params><param><value>
<string>admin</string></value></param>
<param><value><string>112233</string></value></param></params>
</methodCall>
According to the reports from a security firm, hackers use xml-rpc to perform DDos attack on WordPress sites. It might be, and you could have no idea that your site is attacking other sites. If you are not going to do remote publishing and to stop your WordPress website from being misused, then disabling XML-RPC is a good idea.
Being a well known issue within WordPress and even the WordPress developers are aware of it, it can’t be patched though as in many cases this terms out to be a feature.
You can disable XML-RPC via plugins such as Disable XML-RPC Pingback and Prevent XMLRPC.
(Or)
Copy and paste the below line in functions.php to disable XML-RPC completely.
add_filter('xmlrpc_enabled', '__return_false');Note: The same can be achieved by using popular security plugins.
You can test your website with this online tool to verify your site is DDos’ing other websites.
9. Replace WordPress Admin page logo
Add the below code in functions.php
function custom_loginlogo() {
echo '<style type="text/css">
h1 a {background-image: url('.get_bloginfo('template_directory').'/images/site_logo.png) !important; }
</style>';
}
add_action('login_head', 'custom_loginlogo');
10. Change WordPress Login error message
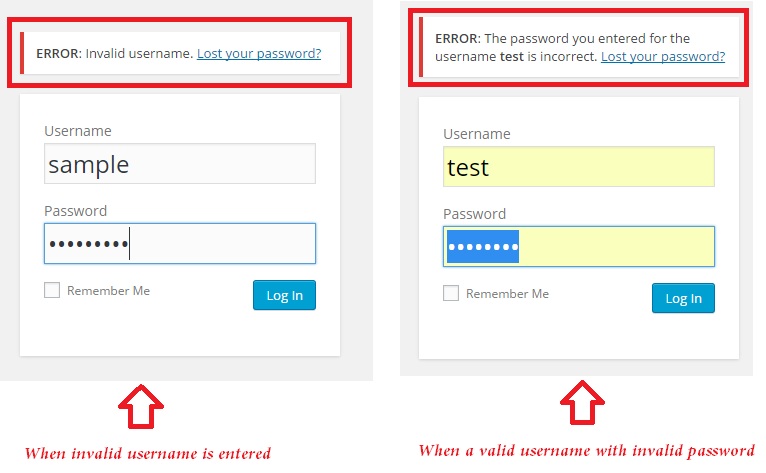
When an invalid username or password is entered, by default WordPress displays a detailed error message – stating whether the username is invalid or the password entered for the username was wrong. Such a detailed message can provide a hint to the hacker.
But you can easily change the login errors and display a custom message using the below code. Copy and paste the below code in functions.php
function no_wordpress_errors(){
  return 'You do not belong to this site!';
}
add_filter( 'login_errors', 'no_wordpress_errors' );
11. Change WordPress admin URL
Protecting Admin page by changing its URL is a good practice. This guide will tell you why you should change WordPress Admin URL and how you can do that.
12. Enable Two-Step Authentication for WordPress Admin
This is one of the most important step in securing your website. Even if someone knows the username and password, they still have to go through an extra authentication step. You can easily enable Two-step (or factor) authentication using popular plugins such as Google Authenticator, Clef etc…
Note: You can also implement two-factor authentication using iThemes Security plugin.
13. Install User lockout Plugin
Locking down or disabling WordPress account after invalid login attempts is one of the best method to stay away from Brute force attacks. Check this article to know how you can actually do this.
14. Delete unwanted themes and plugins
No code is 100% safe and that applies to themes and plugins inside the WordPress directory. If you are not using a particular plugin or a theme, then go ahead and delete those. Less unwanted codes, more secure your site is.
Note: You should also ensure that theme and plugins are not leaking information via comments (sometimes they get published in HTML source)
15. Use Best Security Plugins
Here’s the list of Top security plugins for WordPress. Install at least one.
16. I love iThemes Security Plugin
iThemes Security plugin (also known as Better WP Security) is one of best plugin out there – that helps in protecting WordPress against various attacks. The plugin allows you to track user actions, enable two factor authentication, automatic scanning to identify malwares, set password expiration, force strong password rules, IP address banning, tweaking wordpress settings etc…
Note: The plugin is capable of doing most of the tips that we are speaking here…For instance, changing wp-admin url, changing the location of default upload directory, two-factor authentication, disable file editing, disable xmlrpc, changing default username etc…If you are not comfortable in editing theme’s functions.php or htaccess, then iThemes Security Plugin will do it for you.
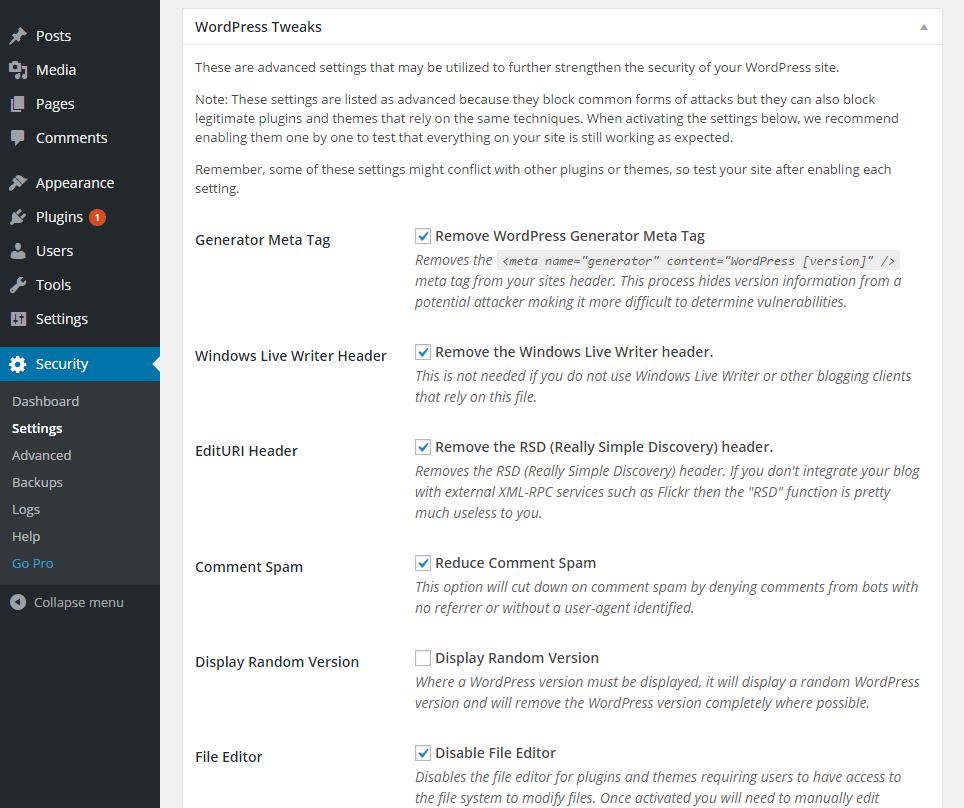
Lookout for System tweaks section under Security > Settings – where you can prevent certains files from being accessible by public, disable directory browsing, removing suspicious query strings, disabling PHP script execution under uploads folder etc…
Lookout for WordPress tweaks section under Security > Settings – which allows you to remove automatically generated meta tags, disabling XML-RPC, disable file editor, disable login error message, force unique nickname for user etc…
17. Detect ‘libwww-perl’ and disable it
libwww-perl (LWP) is a WWW client-server library for Perl, which can be used by hackers, bots and crackers. To detect and disable that, follow the steps in this guide.
18. Change those default Security Keys
This guide will tell you why WordPress security keys are important and how you can generate an unique one for your site.
19. Rename Theme folder
If you don’t want to publicize the name of a theme that you are using, then you may rename the theme folder under ‘wp-content/themes/‘ (may be you don’t want your competitor to know the theme you are using)
20. Multi-author site? Disable dashboard
If your WordPress site is going to feature articles from multiple authors, then you may not want your contributors to view the various widgets displayed on the Dashboard. There are plenty of plugins out there in the repository that helps you to remove dashboard for specific user roles.
21. Remove unwanted Meta tags
These automatically generated Meta tags can leak certain information about your website – like WordPress version information. Refer this guide to remove unwanted meta tags.
22. Remove Query strings from URLs
Just like the way we removed meta tags, you should also remove query strings from various URLs seen in HTML source code. For example, by default the CSS, JavaScript URLs added by WordPress and its plugins will have query strings such as ‘ver’ with the version number as the value. These query strings does not do any good to SEO, because URLs that contain query strings are not considered to be static resources and will not be cached by most of the CDN and proxy servers.
Here’s the guide that can help you to remove those query strings.
23. Remove or hide Secondary feed URLs
By default WP adds multiple RSS feeds (such as comment feed, archive feed, post feed, category feed etc…) into HTML source. If you don’t want to show all of those feeds publicly, then here’s the guide to remove those.
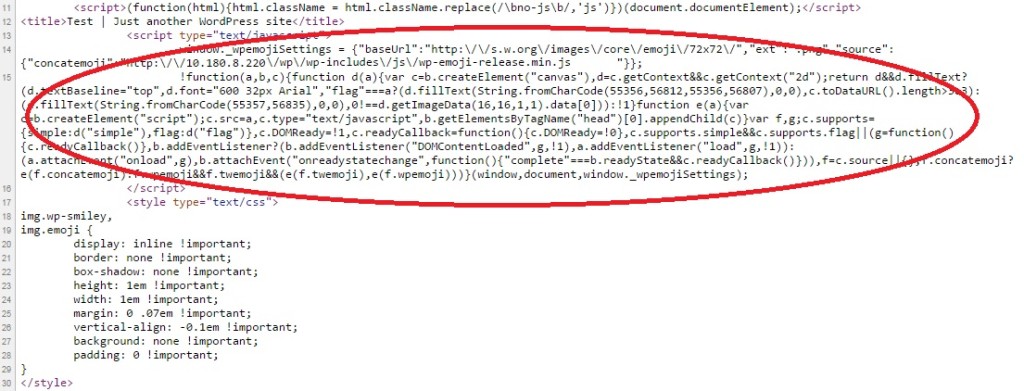
24. Remove extra JS file added to support Emoji
Starting from version 4.2, WordPress adds an extra Javascript file to support 4 bit unicode characters. This guide will help you to remove those.
25. Remove HTML tag support in WordPress Comments
By default WordPress allows HTML tags (such as anchor, bold, italic etc..) to be used in comment boxes. Well, html tags help spammers to add links, highlight their brand or marketing terms in bold or italic and finally that’s going to make your site ugly and the scary thing is, it plays a big role in negative SEO as well. You shall remove html tags support in WordPress comments using the below code. Just copy and paste the below line in functions.php.
add_filter( 'pre_comment_content', 'esc_html' );
26. Limit Comments Length
Comments help your visitor to engage in a healthy conversation without leaving your site and sometimes it helps an author to understand what visitors actually need. But what should be the ideal length of a comment? 100 or 1000 or 5000 characters? An expert say, a good or a helpful comment can’t be less than 50 characters and never be more than 2000 characters. It make sense, as lengthier comment might have an negative SEO and it’s quite difficult to moderate as well.
To limit the length of a comment, just copy and paste the below code (credit) in functions.php
add_filter( 'preprocess_comment', 'wpb_preprocess_comment' );

function wpb_preprocess_comment($comment) {
    if ( strlen( $comment['comment_content'] ) > 2000 ) {
        wp_die('Comment is too long. Please keep your comment under 2000 characters.');
    }
if ( strlen( $comment['comment_content'] ) < 50 ) {
        wp_die('Comment is too short. Please use at least 50 characters.');
    }
    return $comment;
}
27. Prevent search engine from Indexing XML Sitemap
We want search engines to use XML sitemap for better crawling of our website, but we don’t want them to Index and show it in the search results (they are supposed to show the actual article page isn’t?). The below code will instruct search engines to not index the sitemap. Copy and paste the below code in .htaccess file.
<IfModule mod_rewrite.c>
 <Files sitemap.xml>
  Header set X-Robots-Tag "noindex"
 </Files>
</IfModule>
28. Move WordPress Uploads directory
Changing the default uploads directory in WordPress does have few advantages – moving it to a subdomain (to a cookieless domain that helps reduce the header size of every http request), easy backup management and better organized URL structure.
define( 'WP_CONTENT_URL', 'http://img.example.com/images' );
define( 'WP_CONTENT_DIR', $_SERVER['HOME'] . '/img.example.com/images' );
Note: The iThemes Security plugin has an option to move wp-content directory.
29. Disable Post Revisions
Post revisions allows you to track the changes and it helps to revert back to previous revisions, but this feature considerably increases the database size. Adding the below line in wp-config.php will completely disable post revisions.
define( 'WP_POST_REVISIONS', false);
30. Increase the interval of Posts Autosave
By default, WordPress will automatically save your post as drafts while you type. In case if the browser crashes, you can still recover the post that was auto saved as draft. WordPress autosaves the post at an interval of 60 seconds and if you ever want to increase it, just copy and paste the below line in wp-config.php file.
define( 'AUTOSAVE_INTERVAL', 180 );
The above line will increase the autosave interval to 180 seconds.
31. Prevent search engines from Indexing core files
Like we prevented search engines from indexing the XML sitemaps, you may also want to do the same for WP core files located under wp-admin, wp-include, themes and plugins folders. To do that, copy and paste the below code in robots.txt located under the WordPress root directory.
User-agent: *
Disallow: /wp-admin/
Disallow: /wp-includes/
Disallow: /wp-content/plugins/
Disallow: /wp-content/themes/
32. Disable Admin bar
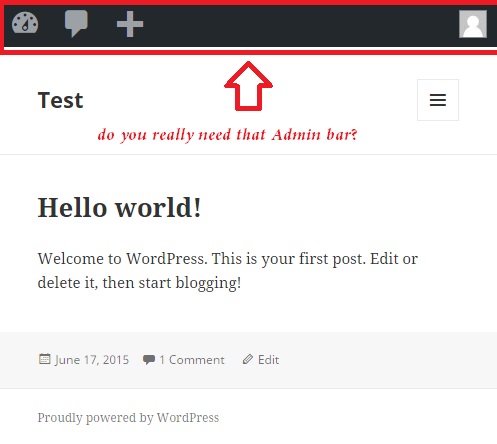
I’m not a big fan of an Admin bar that appears at the top when you are logged in to the WordPress.
If you are like me and wish to disable it, here’s how you can do that – simply add the below line in functions.php and you are done.
add_filter('show_admin_bar', '__return_false');33. Remove WordPress Footer notes
Of course, WordPress helped you in setting up your website in no time and our kudos to this awesome software. But sometimes you may not want others to know that you use WordPress (and that’s the main reason why we hide or change wp-admin URL, wp-content folder, renamed theme folders, removed meta tags, removed query strings etc…and etc…). So leaving that line ‘Powered by WordPress‘ in the footer is something that I’m not a fan of. Do you still want that?
Note: You can still give credits to WordPress by contributing to the community or at least by writing about WordPress.
34. Disable Automatic Updates
Update WordPress and Plugins regularly, but not automatically. Automatic updates are easier, on time, but they might also introduce new problems to your code. It’s always better to disable automatic updates and do it manually (caution: manual updates, not for a beginner).
Copy and paste the below code in wp-config.php to disable WP core update:
define( 'WP_AUTO_UPDATE_CORE', false );
Copy and paste the below line in functions.php to disable automatic plugin updates:
add_filter( 'auto_update_plugin', '__return_false' );
and the below line for disabling theme updates:
add_filter( 'auto_update_theme', '__return_false' );
35. Increase WP upload size
Add the below line to php.ini file and you’re done.
upload_max_filesize = 64M
36. Limit number of posts in RSS feed
Go to Settings > Reading and increase ‘Syndication feeds show the most recent‘
37. Use Distraction-free mode for writing
The WP editor is awesome, but it also (the editor) has plenty of widgets around and that can distract you while writing posts. But no worries, simply enable distraction free mode (a star like icon with four arrows, located just below the Visual/Text mode). If you don’t find distraction-free mode icon, then you have to enable it first.
38. Stay logged-in to WordPress for longer duration
By default, “Remember Me” option in the login page will keep you logged in for 2 weeks. If you want to stay logged-in for longer duration, then copy and paste the below code in functions.php.
add_filter( 'auth_cookie_expiration', 'stay_longer' );
function stay_longer( $expire ) {
  return 8640000; // 100 days in seconds
}
39. Remove unused CSS using Chrome Developer tool
As a developer you keep adding few features and change designs often, but when you do that, you should also remember to remove unused CSS styles, as this will help in reducing file size and result in faster rendering by the browser.
Click here to identify unwanted styles used in your theme and remove those.
40. Display Custom message instead of “Error Establishing Database Connection” Error
“Error Establishing Database Connection” occurs whenever the WordPress is not able to connect to database (may be the database server is not reachable or invalid username or password). Whatever might be the reason, but displaying that message to your website visitor does not sound that great. In fact, it’s very important to let search engines know that the issue is temporary and it will be resolved after some delay. To do that, you need to set HTTP 503 status and customize the error message. Click here to know how you can do that.
41. Install WP-Optimize to optimize database
WP-Optimize is a simple plugin that allows you to keep WP database clean and optimizes it to reduce size. It allows you to remove stale post revisions, spam & trashed comments, trashed posts, auto drafts, transient options, trackbacks & pingbacks, schedule clean up etc…
42. Install W3 Total Cache to speed your site
W3 Total cache is one of the popular caching plugin for WordPress. It allows you cache page, databases, objects etc…allows you to connect to external CDN services to load static resources, minify HTML, CSS and Javascript files etc…When the plugin is configured properly, you’ll really love the speed at which your site loads.
43. Prioritize Critical Content above the fold
Prioritize critical content above the folder. For example, the visitor on your website always want to view the content immediately (not the advertisement, mega menus or sidebar) and so the search engines. This tutorial will tell why prioritizing content above the fold is important and how you can do that.
44. Install Best SEO Plugin
SEO is not an easy task and keeping it consistently complaint is much more difficult. So take a help from popular SEO plugins such as “WordPress SEO by Yoast” – with more than 1+ million downloads (at the time of writing this article), it’s easily the most popular SEO plugin you’ll ever need.
45. Analyze and Speed up your site
You may use gtmetrix.com, the popular service that analyzes your web page and scores based on critical metrics. It helps you develop faster, efficient website.
46. Cache Static contents by using ExpiresByType
The static resources such as CSS, JavaScripts, Images may not be changing often and it’s a good practice to set them an expiry date. To do that, you can set ‘ExpiresByType‘ attribute in httpd.conf as below:
<IfModule mod_expires.c>
ExpiresActive On
ExpiresByType text/javascript "access plus 1 month"
ExpiresByType application/x-javascript "access plus 1 month"
ExpiresByType image/jpg "access plus 1 year"
ExpiresByType image/jpeg "access plus 1 year"
ExpiresByType image/gif "access plus 1 year"
ExpiresByType image/png "access plus 1 year"
ExpiresByType image/x-icon "access plus 1 year"
ExpiresDefault "access plus 2 days"
ExpiresByType text/css "access plus 1 month"
<filesMatch "\\.(js|js.gz)$">
ExpiresDefault A604800
</filesMatch>
</IfModule>
47. Handle Adblockers smartly
Most of the users install Ad-blockers on their browser and that might affect website’s advertisement revenue. Handle them smartly by detecting blocker plugins and display alternate content – this tutorial will help you.
48. Use Cloudflare Free Service
Cloudflare is a free service that helps supercharge your website – speeds up your website by distributing content across the world, secures site by protecting server’s IP address, provides free SSL certificate that you may need to serve wp-admin page and plenty of apps…Using cloudflare is simple and you get a WordPress plugin as well.
49. Optimize Images automatically
If your website is going to load tons of images, then it’s very important to optimize those. Image optimization does not only help your website to load faster, but also improves site’s SEO. You can take a help from popular Image optimization plugins such as EWWW Image Optimizer, Imsanity etc…
50. Manage 301 redirects easily
Sometimes you need to redirect certain URLs by writing few 301 redirection rules in .htaccess. To be frank, 301 redirection rules are not that easy and might look confusing (at least for the beginners). Why not then take a help from one of the best Redirection plugin.

