In continuation to our how-to tutorials on Android Studio, today we’ll see how to create a Horizontal swipe views in Android using ViewPager and PagerAdapter. You can implement swipe views in your application using ViewPager layout widget, which is available in Android support library (android.support.v4.view.ViewPager). ViewPager is primarily a layout widget in which each child view is a separate page in the layout. Apart from ViewPager, we will be using PagerAdapter, which is also available in Android support library (android.support.v4.view.PagerAdapter), that defines the data displayed by the ViewPager control. It means, PagerAdapter is responsible to load and display each page created under the layout during runtime.
For the demonstration purpose, lets create an app that loads five different pages (views) and displays it when you swipe horizontally on the screen.
Step 1: Create a New Project as shown in this tutorial. Lets name the project as “viewPagerAppDemo” and leave the rest as default. It means, my Activity class will be MainActivity.java and the main layout file will be ‘activity_main.xml‘.
Step 2: Verify whether you have android.support.v4 library added by clicking ‘File > Project Structure > Libraries‘
If you don’t have one, then download it from here.
Step 3: Define ViewPager.
You’ll have to create a ViewPager layout widget in the activity_main.xml file located under ‘res > layout‘. To do that copy the below code and paste it in the activity_main.xml file.
<LinearLayout xmlns:android="http://schemas.android.com/apk/res/android"
 android:orientation="vertical"
 android:layout_width="fill_parent"
 android:layout_height="fill_parent">
 <android.support.v4.view.ViewPager
 android:layout_width="match_parent"
 android:layout_height="match_parent"
 android:id="@+id/viewpager_layout"/>
 </LinearLayout>
We have set ‘viewpager_layout’ as ‘id’ for ViewPager layout widget. Copy that, as we’ll need to create a new resource for it. To do that, select ‘viewpager_layout’ located under component tree and in the properties window search for ‘id’ attribute and click the button to launch the resources dialog. In the Resources dialog box, click “New Resources” button located at the bottom and assign ‘viewpager_layout’ as ‘Resource Name’ and click OK.
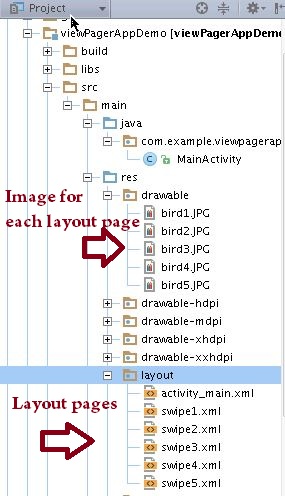
Step 4: Lets create content for swiping. For demo, we will have five images (one per swipe page). To do that, just right-click on ‘res‘ folder and select ‘New > Android resource directory‘ and enter ‘drawable‘ as Resource directory name and the Resource type as ‘drawable‘. Once done, you’ll see ‘drawable’ directory created under ‘res’ folder.
Step 5: Copy the images to drawable folder. For instance, my drawable folder location is as follows.
//localhome//henry//AndroidStudioProjects//viewPagerAppDemo//viewPagerAppDemo//src//main//res//drawableStep 6: Lets create layout Pages now! I means, the swipe pages; each will contain one image that we copied in step 5. We will name the pages as swipe1, swipe2 to swipe5. To do that, just right-click on the ‘res > layout‘ and choose “New > Layout resource file‘. Checkout the below image for your reference.
Step 7: Once the layout pages are created, we will add the ImageView widget to each page as below,
<LinearLayout xmlns:android="http://schemas.android.com/apk/res/android"
 android:orientation="vertical"
 android:layout_width="match_parent"
 android:layout_height="match_parent">

 <ImageView
 android:layout_width="match_parent"
 android:layout_height="match_parent" android:id="@id/imageView1"
 android:src="@drawable/bird1" android:adjustViewBounds="true" android:scaleType="fitXY"
 android:contentDescription="bird1"/>

</LinearLayout>
Copy the above code and add it to the each layout resource file. Note: You will have to change ‘android:src‘ to refer different image for each page. Also create id resource and string resource for ‘android:id‘ and ‘android:contentDescription‘ for each page. To do that, select ‘imageView’ from the component tree and in the properties window search for ‘id’ attribute and click the button located on the right side of the attribute to launch resource dialog and set the names. Similarly do it for creating string resource as well. For reference, checkout the strings.xml and id.xml in the source zip file given at the bottom of this page.
Step 8: Creating custom PagerAdapter
We’ll create a custom PagerAdapter as ‘MyPagerAdapter‘ extends PagerAdapter class. To do that, right-click on ‘com.example.viewpagerappdemo’ and select ‘New > Java class‘ and name it as ‘MyPagerAdapter‘. Once the class file is created, copy and paste the below code.
public class MyPagerAdapter extends PagerAdapter {
 public int getCount() {
 return 5;
 }
 public Object instantiateItem(ViewGroup collection, int position) {
 LayoutInflater inflater = (LayoutInflater) collection.getContext()
 .getSystemService(Context.LAYOUT_INFLATER_SERVICE);
 int resId = 0;
 switch (position) {
 case 0:
 resId = R.layout.swipe1;
 break;
 case 1:
 resId = R.layout.swipe2;
 break;
 case 2:
 resId = R.layout.swipe3;
 break;
 case 3:
 resId = R.layout.swipe4;
 break;
 case 4:
 resId = R.layout.swipe5;
 break;
 }
 View view = inflater.inflate(resId, null);
 ((ViewPager) collection).addView(view, 0);
 return view;
 }
 @Override
 public void destroyItem(ViewGroup arg0, int arg1, Object arg2) {
 ((ViewPager) arg0).removeView((View) arg2);
 }

 @Override
 public boolean isViewFromObject(View arg0, Object arg1) {
 return arg0 == ((View) arg1);
 }

 //public boolean isViewFromObject(ViewGroup arg0, Object arg1) {
 // return arg0 == ((View) arg1);
 //}
 @Override
 public Parcelable saveState() {
 return null;
 }
}
Whenever you extend PagerAdapter class, make sure to create few key methods such as getCount(); which defines the size of your pages. In our case it is, 5. Next, you will have to implement the instantiateItem() method to inflate the appropriate layout files based on the swipe position. To do that, we have created a switch case that inflates the layout pages (swipe1, swipe2….swipe5).
Finally you’ll have to create a method destroyItem() to delete the layout page that is longer displayed on the screen. This method will actually free the memory.
Step 9: Bind MyPagerAdapter class. Copy the below code and paste under ‘OnCreate‘ method of MainActivity.java.
protected void onCreate(Bundle savedInstanceState) {
 super.onCreate(savedInstanceState);
 setContentView(R.layout.activity_main);
 MyPagerAdapter adapter = new MyPagerAdapter();
 ViewPager myPager = (ViewPager) findViewById(R.id.viewpager_layout);
 myPager.setAdapter(adapter);
 myPager.setCurrentItem(2);
 }
You are done. Make and Run the application.
Download source for your reference and try the apk as well.
Note: The application was developed using Android Studio.


My layouts have ImageButtons but and I have the click listener on the corresponding class. How can I make the button functional?
I did all of these steps But I have errors 🙁
download the source and u can compare your code with that 🙂
hello, thank you very much very useful, you can do so that when you launch the app starts every time on a layout (page) different?