The most interesting and key benefits of IPv6 addressing features implemented is a facility to allow devices on an IPv6 to actually configure themselves independently, which is called as Autoconfiguration. Auto-configuration offers true-plug-and-play connectivity similar to what DHCP provides in IPv4 along with an additional feature to configure even without a DHCP server! IPv6 offers two types of autoconfiguration:
- Stateful Autoconfiguration
- Stateless Autoconfiguration
Stateful Autoconfiguration
Stateful Autoconfiguration is the IPv6 equivalent of DHCP of IPv4. A new protocol, called DHCPv6 is used to provide the addressing and service information similar to DHCP in IPv4. This is called “Stateful” because both DHCP server and the client maintain state information to keep addresses from conflicting, to handle leases, and to renew addresses over time. DHCPv6 is used when a site requires tighter control over exact address assignments.

Stateless Autoconfiguration
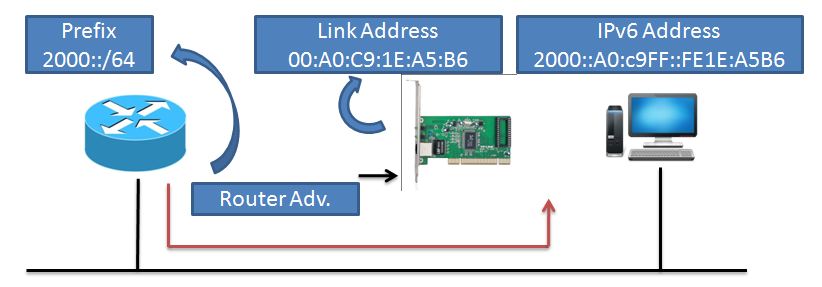
The other type of autoconfiguration in IPv6 is Stateless Autoconfiguration. The stateless mechanism allows a host to generate its own addresses using a combination of locally available information and information advertised by routers. This mechanism does not require the establishment of a server to delve out address space. The IPv6 stateless autoconfiguration mechanism requires no manual configuration of hosts, minimal (if any) configuration of routers, and no additional servers. This method uses the MAC address of the device to create an IPv6 address with the 2000:: prefix set in the router.
The stateless approach is used when a site is not particularly concerned with the exact addresses hosts use, so long as they are unique and properly routable. Stateful and Stateless Autoconfiguration may be used simultaneously.
Advantages of Stateless Autoconfiguration in IPv6
- Doesn’t require support of a DHCP server
- Allows hot plugging of network devices
- Cost effective
- Suitable for wireless networks

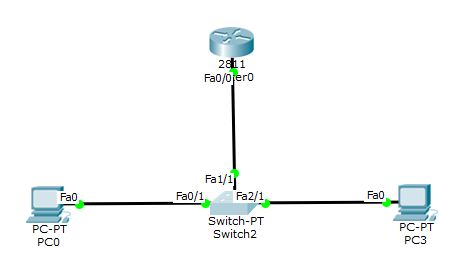
Consider the below topology for Stateless Autoconfiguration. Carryout the following steps to assign IPv6 addresses using Stateless Autoconfiguration. Choose the cable type as “Automatically choose connection type” for connecting nodes.

Router Configuration
Step1: Firstly we shall configure the router. Enter the corresponding interface and enable IPv6.
Router>en
Router#configure terminal
Router(config)#interface fastEthernet 0/0
Router(config-if)#ipv6 enable
Step2: Configure a link local address and a global unicast address on this interface. To reduce the configuration complexity, We shall use eui-64 standard.
Router(config-if)#ipv6 address autoconfig
Router(config-if)#ipv6 add 2000::/64 eui-64
Router(config-if)#no shutdown
Step3: Enable routing so that this router can be identified as a default gateway.
Router(config)# ipv6 unicast-routing
Step4: Verify that the interface is up and has two IPv6 addresses.
Router>sh ipv6 interface brief
FastEthernet0/0            [up/up]
    FE80::201:C7FF:FE27:6701
    2000::201:C7FF:FE27:6701
FastEthernet0/1            [administratively down/down]
Vlan1                      [administratively down/down]
Router>
Now the configuration on the router is done, let’s enable the auto-config on the PC’s
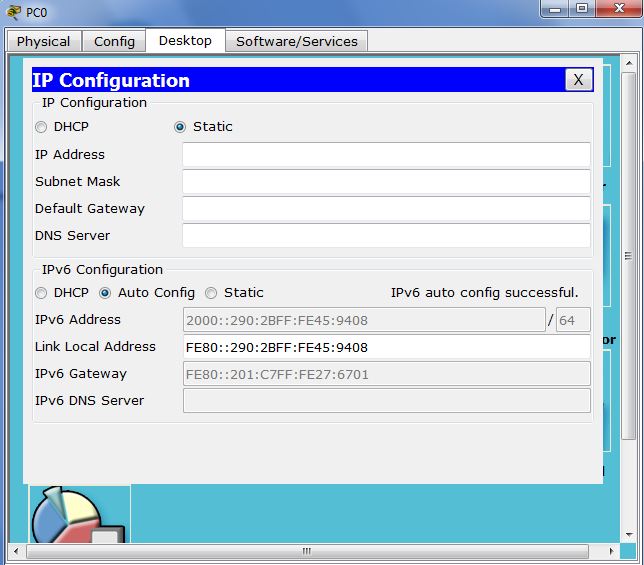
Step5: Goto PC’s IP Configuration and under IPv6 configuration section, choose Auto Config. The gateway and the PC’s IP address will be assigned automatically, as shown in the following pic.

Step6: Now you can test the connectivity using ping command from the command line to the router and view the ICMPv6 packets flowing in the simulation.
Download the working example of IPv6 stateless autoconfiguration: ipv6-stateless-autoconfiguration.pkt
Note: Packet tracer version 6.1.1.0001 was been used to create the above simulation. Request you to use the same version to open the downloaded file.
Also look into the below video on How to enable IPv6 stateless autoconfiguration in packet tracer.


It was a brilliant examples
Really understandable ,wish you add more information about IPv6
really helpfull,wish you add stateful configuration too