Networking devices forward packets using route information that is either manually configured (static routing) or dynamically learned (dynamic routing) using a routing protocol. In this article you will learn how to assign IPv6 addresses and how to configure IPv6 static and dynamic routing in Cisco’s Packet Tracer simulator.
Static Routing
Static routes are manually configured, maintained and updated by a network administrator defining an explicit path between two networking devices. Static routes are useful for smaller networks.
Advantages of Static Routing
1. Static routes include security and resource efficiency.
2. Use less bandwidth than dynamic routing protocols.
3. Minimal CPU/RAM used.
4. Granular control on how traffic is routed.
Disadvantages of Static Routing
1. If the topology of the network changes, it has to be updated manually.
2. If a link goes down, there is “No Dynamic” fault tolerance.
3. Impractical on large network.
How to Configure IPv6 Static Routing
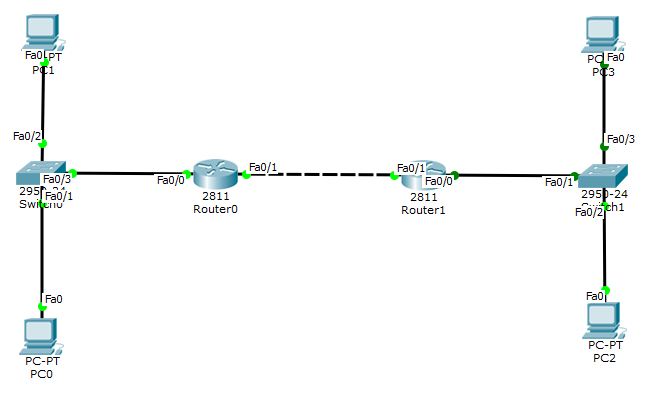
Now lets see how to configure the IPv6 Static Routing for the below topology.

The two router’s would communicate through interface fastEthernet 0/1 using the IP 2001::10/64 and 2001::20/64. The PC’s PC0 and PC1 are connected to Router0 through 2000:1::/64 network and similarly PC2 and PC3 to Router 1 through 2000:2::/64 network. Below is the complete addressing table.

Assign the IP addresses to the PC’s accordingly. (Refer video for steps).
Router0 Configuration
Router0>en
Router0#configure terminal
Router0(config)#ipv6 unicast-routing
Router0(config)#interface fastEthernet 0/0
Router0(config-if)#ipv6 address 2000:1::1/64
Router0(config-if)#no shutdown
Router0(config-if)#exit
Router0(config)#interface fastEthernet 0/1
Router0(config-if)#ipv6 address 2001::10/64
Router0(config-if)#no shutdown
Router0(config-if)#exit
Router0(config)#ipv6 route 2000:2::/64 2001::20
For Router0, to reach the 2000:2::/64 network, the packets should be forwarded to 2001::20.
Router1 Configuration
Router1>en
Router1#configure terminal
Router1(config)#ipv6 unicast-routing
Router1(config)#interface fastEthernet 0/0
Router1(config-if)#ipv6 address 2000:2::1/64
Router1(config-if)#no shutdown
Router1(config-if)#exit
Router1(config)#interface fastEthernet 0/1
Router1(config-if)#ipv6 address 2001::20/64
Router1(config-if)#no shutdown
Router1(config-if)#exit
Router1(config)#ipv6 route 2000:1::/64 2001::10
Similarly for Router1, to reach the 2000:1::/64 network, the packets should be forwarded to 2001::10.
Verify the static routing by pinging from a PC of one network to a PC of another network. You can use tracert command on a PC to see the path a packet takes.
Download the working example of IPv6 Static Routing: ipv6-static-routing.pkt
Note: Packet tracer version 6.1.1.0001 was been used to create the above simulation. Request you to use the same version to open the downloaded file.
Also you can view the video below on How to configure IPv6 static routing in packet tracer.
Dynamic Routing
A dynamic route is created, maintained and updated by a routing protocol running on the router. Similar to IPv4, IPv6 also supports dynamic routing protocols, like RIPng(Next generation Routing Information Protocol), OSPFv3 (Open Shortest Path First) or EIGRP (Enhanced Interior Gateway Routing Protocol). RIPng is also called as RIPv6. RIPv6 is not RIP version 6, instead, it is RIP for IPv6.
Advantages of Dynamic Routing
1. Simpler to configure on larger networks
2. If a link goes down, there is a dynamic fault tolerance.
3. Ability to load balance between multiple links.
Disadvantages of Dynamic Routing
1. More bandwidth consumption due to sharing of updates between the routers.
2. Additional load on CPU/RAM by routing protocols.
3. Routing protocol decides the best route, but not the network.
How to Configure IPv6 Dynamic Routing (RIPng)
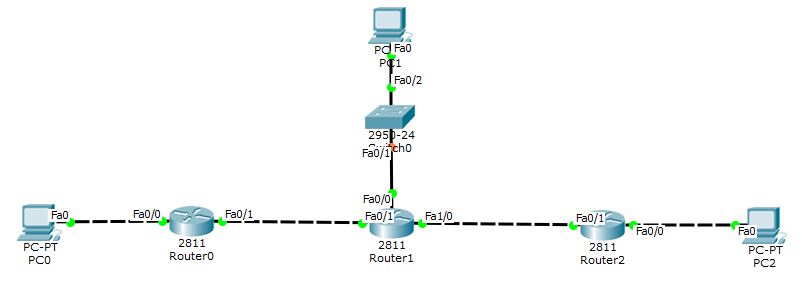
In the below exercise we shall configure RIPng (RIPv6) for the following topology:

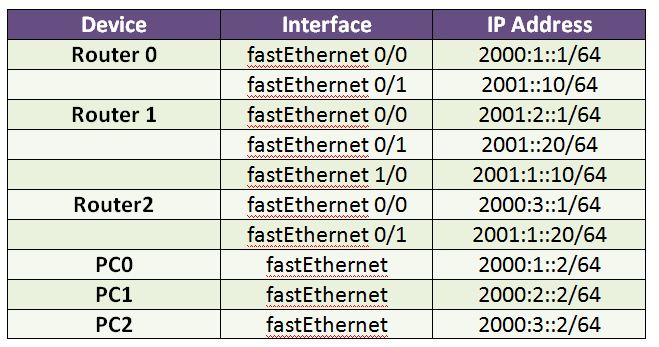
Below is the complete addressing table:

Below are the Router Configurations. Note that “ipv6 rip” command is used to enable the RIP on a particular interface. Also note that net1 in the command “ipv6 rip net1 enable” is just a string and can be of any name. This command enables RIPv6 process on the corresponding interface.
Router 0 Configurations:
Router0>en
Router0#configure terminal
Router0(config)#ipv6 unicast-routing
Router0(config)#interface fastEthernet 0/0
Router0(config-if)#ipv6 address 2000:1::1/64
Router0(config-if)#ipv6 rip net1 enable
Router0(config-if)#ipv6 enable
Router0(config-if)#no shutdown
Router0(config-if)#exit
Router0(config)#interface fastEthernet 0/1
Router0(config-if)#ipv6 address 2001::10/64
Router0(config-if)#ipv6 rip net1 enable
Router0(config-if)#ipv6 enable
Router0(config-if)#no shutdown
Router0(config-if)#exit
Router 1 Configurations:
Router1>en
Router1#configure terminal
Router1(config)#ipv6 unicast-routing
Router1(config)#interface fastEthernet 0/0
Router1(config-if)#ipv6 address 2000:2::1/64
Router1(config-if)#ipv6 rip net1 enable
Router1(config-if)#ipv6 enable
Router1(config-if)#no shutdown
Router1(config-if)#exit
Router1(config)#interface fastEthernet 0/1
Router1(config-if)#ipv6 address 2001::20/64
Router1(config-if)#ipv6 rip net1 enable
Router1(config-if)#ipv6 enable
Router1(config-if)#no shutdown
Router1(config-if)#exit
Router1(config)#interface fastEthernet 1/0
Router1(config-if)#ipv6 address 2001:1::10/64
Router1(config-if)#ipv6 rip net1 enable
Router1(config-if)#ipv6 enable
Router1(config-if)#no shutdown
Router1(config-if)#exit
Router 2 Configurations:
Router2>en
Router2#configure terminal
Router2(config)#ipv6 unicast-routing
Router2(config)#interface fastEthernet 0/0
Router2(config-if)#ipv6 address 2000:3::1/64
Router2(config-if)#ipv6 rip net1 enable
Router2(config-if)#ipv6 enable
Router2(config-if)#no shutdown
Router2(config-if)#exit
Router2(config)#interface fastEthernet 0/1
Router2(config-if)#ipv6 address 2001:1::20/64
Router2(config-if)#ipv6 rip net1 enable
Router2(config-if)#ipv6 enable
Router2(config-if)#no shutdown
Router2(config-if)#exit
Once RIP is configured in all the routers, use the usual diagnostic tools like ping, tracert to check the connectivity as shown below:
PC>tracert 2000:3::2

Tracing route to 2000:3::2 over a maximum of 30 hops:

  1   2 ms      2 ms      2 ms      2000:1::1
  2   4 ms      4 ms      4 ms      2001::20
  3   6 ms      6 ms      6 ms      2001:1::20
  4   8 ms      8 ms      8 ms      2000:3::2

Trace complete.
You can also view the RIP database on the corresponding routers through the following command:
Router#sh ipv6 rip database
RIP process "net1" local RIB
 2000:3::/64, metric 3, installed
    FastEthernet0/1/FE80::230:F2FF:FEAB:4902, expires in 164 sec
 2001::/64, metric 2
    FastEthernet0/1/FE80::230:F2FF:FEAB:4902, expires in 164 sec
 2001:1::/64, metric 2, installed
    FastEthernet0/1/FE80::230:F2FF:FEAB:4902, expires in 164 sec
 2001:2::/64, metric 2, installed
    FastEthernet0/1/FE80::230:F2FF:FEAB:4902, expires in 164 sec
Router#
Download the working example of IPv6 Dynamic Routing using RIPng: ipv6-dynamic-routing-using-RIPng.pkt
Note: Packet tracer version 6.1.1.0001 was been used to create the above simulation. Request you to use the same version to open the downloaded file.
Also you can view the video below on How to configure IPv6 dynamic routing(RIPng) in packet tracer.

