Well, if you are like me who loves to change the fonts on your Android device, then you have landed on the right page. Interestingly changing the fonts in Android is quite easy and doesn’t require rooting the device. However changing fonts using non-rooted methods have few limitations; you will be able to change the font only for the selected part of Android and few devices like Nexus doesn’t come with a native interface to change the fonts. But the rooted devices has plenty of advantages like you can even change the fonts on Nexus and customize the whole OS with the font of your liking. Anyways we are here to speak only about the non-rooted method. So here we go,
How to change fonts on Samsung and LG Android devices?
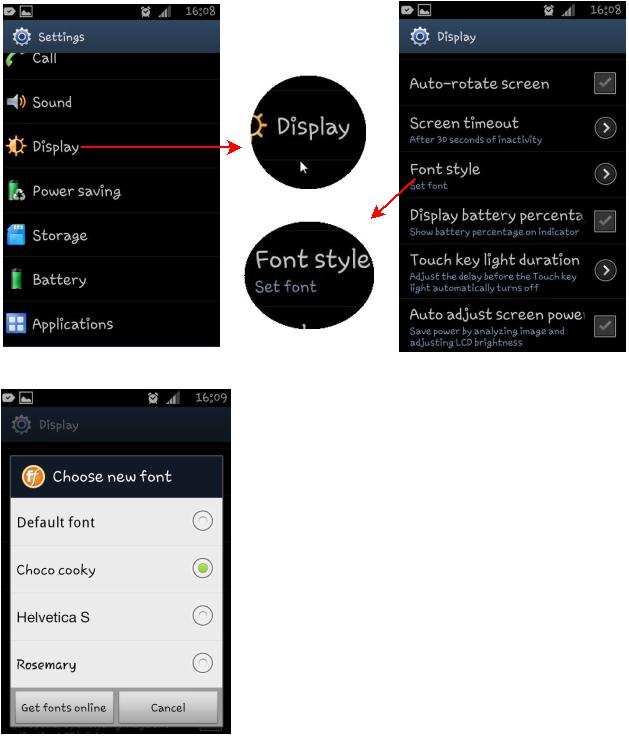
Note: Not all Android devices will come with a native support to change fonts. For instance, the below settings may not be available on few Android devices. But if you own Samsung Galaxy S2, S3, Galaxy Note, Galaxy Note 2, Note 10.1 and Galaxy Camera, then give a go at the below steps. Similarly, these steps might works on certain LG models as well. Try your luck.
Step 1: Tap Settings
Step 2: Tap Display
Step 3: Tap Font Style and tap the font you wish to change. You will have to confirm that you wish to set it as system font.
You will notice the font gets changed immediately without rebooting the device. Samsung devices comes with limited set of fonts, but you can get more from Google Play Store. And the LG users will be redirected to the LG Smart World for downloading the fonts.
Change fonts using GO Launcher EX on Android
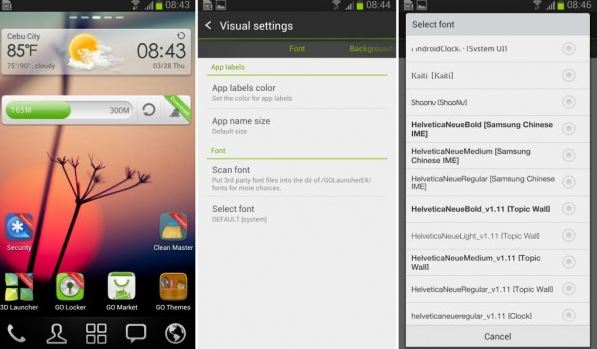
You can use custom launchers like GO Launcher EX for Android, which is downloadable freely from Google Play Store. GO Launcher EX will change fonts only for selected parts (as told earlier, we are following non-root methods) and not the whole system. Here’s how you can use GO Launcher,
Step 1: Copy your TTF font files to /sdcard/GOLauncherEX/fonts directory.
Step 2: Launch “Go Launcher EX”
Step 3: On the main screen of the app, tap the Menu button or swipe the screen upwards.
Step 4: Tap on Visual settings.
Step 5: Switch to the Font tab located on the left.
Step 6: Tap ‘Scan Font‘ and the app will scan your directories in search of font files.
Step 7: Once the app detect fonts, then tap on it to use.
The app will change the fonts immediately without the need of rebooting the device. If you are not happy and want more fonts, then download GO Launcher Fonts.
Checkout GO Launcher EX and Go Launcher Fonts
Changing Fonts using iFont
iFont app from Google Play store can help you to install beautiful fonts on your device. Interestingly, once the font is installed, it takes you right away and doesn’t require to reboot the device.
Step 1: Head on to iFont on Google Play Store and install it.
Note: Sometimes you might have to allow apps to be installed from unknown sources.
Step 2: Launch iFont and jump to Online tab and select a font which you like to install from the list.
Step 3: Hit download to get the font. Once done, tap “Set” button to apply the font.
Step 4: The font will be applied instantly and doesn’t require to reboot the device.
Checkout more Tips and Tricks on Android here…


