Most of us use smartphones and computers simultaneously but hate switching between them every now and then. There’s always that moment where you have to keep your focus glued to the screen and then a notification arrives to make you go unlock your phone and deal with it before coming back to your larger, more attention-hungry device. So how about accessing your smartphone on desktop?

Scrcpy – An open-source, lightweight tool makes use of a popular development feature called the Android debugging bridge or ADB, which allows you to do that. ADB is a command-line tool that creates a bridge between your PC and the Android device which you can use to sideload apps onto it, debug the applications or the operating system on the phone.
Scrcpy uses ADB to run a server on your android device and then communicates with it from your PC as a client through an ADB tunnel. Throughout this process, your phone is termed as the ADB server and the computer is called the ADB client. Scrcpy pushes a server file onto the phone and hosts it, and removes it from the phone once the application is terminated, leaving no clutter behind.
Why do we think scrcpy is cool?
- Works on Windows, Mac and Linux.
- The tool itself along with the required ADB files is lightweight.
- It does not require any software installation on your phone. It pushes a file of approximately 2MB when the server is initiated and cleans up afterward.
- No root access required.
- Supports connections over USB, WiFi, and even a Local Area Network for remote connectivity.
- Includes command-line arguments for a lot of mirroring options.
How to use scrcpy?
Setting up your phone for ADB access:
- Enable developer options on your phone Settings>system>about phone>tap on “build number” 7 times.

- Enable USB debugging: Settings>system>developer options>usb debugging
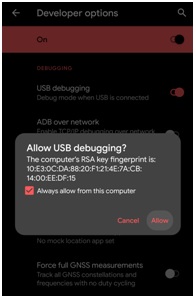
You will need to grant Debugging permissions to each computer you connect your phone for USB debugging. The popup appears when you connect the phone to a computer while USB debugging is enabled. This is to ensure nobody takes over your device without your notice.
- Alternatively, if you plan on using it wirelessly, you will also need to turn on “ADB over the network”, in Developer settings as it needs to allow devices over the TCP/IP protocol to establish the debugging bridge connection for scrcpy to function.
Setting up scrcpy on your computer:
- Download the latest version of the tool from their Github page
Here, you also get the source code for the tool and a bunch of extra information that you can use to optimize your experience.
- Extract all files
- Connect the phone to pc via USB
- Run scrcpy.exe
For a wireless connection, make sure that your pc and phone are connected to the same WiFi.
- Get your device IP address: Settings>about phone>status>IP address
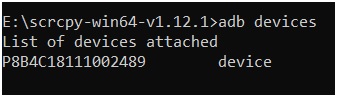
- Check connected ADB devices on cmd: ADB devices
This is the serial number of your device (settings>about phone>status>Serial number)
- Enable ADB over TCP/IP on your device: ADB TCPIP XXXX (last four digits of your device IP address)

- Remove USB connection
- Connect to your device: ADB connect device_ip:XXXX
- Run scrcpy.exe
Tips & Tricks for using scrcpy:
As an extra, we’d like to share with you some tips and tricks for this tool that we’ve learned over time.
Scrcpy is a tool that runs on the command line. What this means is that you can just type “scrcpy” in cmd while it’s run from the folder where scrcpy is extracted and it will execute scrcpy. What it also means is that just like most other command-line tools, scrcpy can take command line arguments. These are optional inputs that you can use to tweak how scrcpy functions.
You can execute scrcpy from command-line just like that with these command-line arguments, or you can write them into a file with the extension “.bat” so that you can reuse each setting without going to command-line each time.

For example, when trying to mirror the phone in a very high bit rate and at the maximum resolution available on your device the command would look something like this:
scrcpy --bit-rate 30M --max-size 1080
Instead of going to the command line and typing this out each time, you can save the above command in a file like maxRes.bat and every time you run maxRes.bat, scrcpy will run with those settings applied.
The GitHub page of scrcpy has detailed info about each valid command-line argument. We suggest you go through that if you’re interested in how this works. Below are our favorite combinations of these for each purpose that we like to use them for.
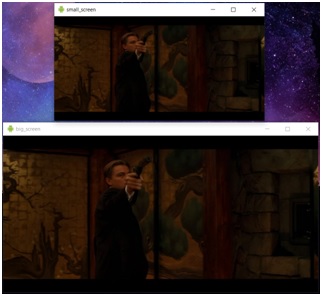
Changing screen resolution by adjusting max-size attribute
scrcpy --bit-rate 20M --max-size 480 --window-title small_screen
scrcpy --bit-rate 20M --max-size 720 --window-title big_screen
Control delay by changing bit-rate
scrcpy --bit-rate 2M --max-size 720 --window-title slow //2mbps
scrcpy --bit-rate 20M --max-size 720 --window-title fast //20mbps
Setting a lower bitrate reduces delay in transmission over wireless mirroring whereas a higher bitrate results in the smoother display.

Movie mode minimizing delay by increasing bit rate, top left corner, borderless
scrcpy --always-on-top --window-x 0 --window-y 0 --bit-rate 20M --max-size 720 --window-borderless
Read mode by Lower bitrate, top left corner, borderless
scrcpy --always-on-top --window-x 0 --window-y 0 --bit-rate 20M --max-size 720 --window-title read_mode
Read-only mode: In this mode, the phone can not be controlled by a keyboard or mouse. Only display is available.
scrcpy --no-control or scrcpy -n
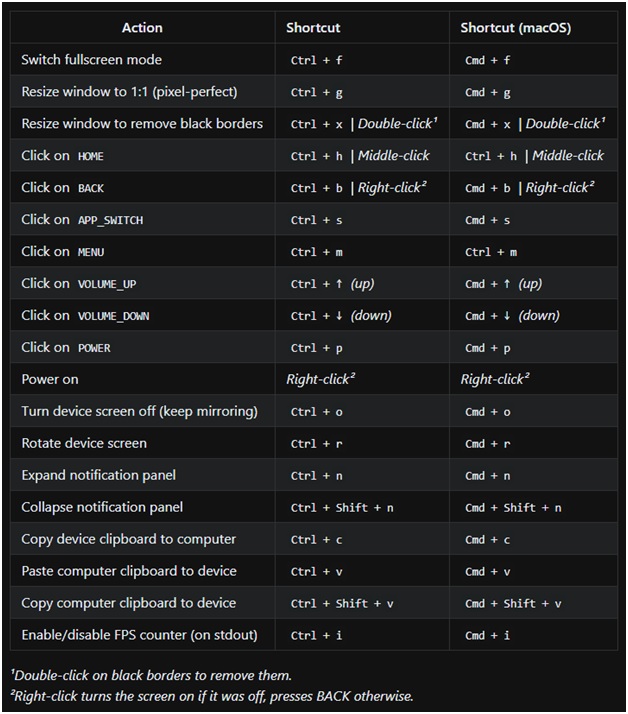
Here are some super useful control shortcuts for the application: