The advent of Windows 8 brought in a whole set of new features. The touch-friendly tiles, applications, Metro, Charm’s bar, and variety of shortcuts. Of all, the ribbon interface for File Explorer is definitely among the best features in Windows 8.
But what is this Ribbon?

How do you turn on Ribbon in your File Explorer?
By pressing Ctrl-F1 or clicking the downward-facing arrow on the upper right of its screen. The Ribbon displays, and the downward-facing arrow turns into an upward-facing arrow. To turn it back off, press Ctrl-F1 again or click the upward-facing arrow.
Once you have your ribbon, you’ll discover a multitude of straightforward options to make optimal use of your File Explorer. Here, we list the most convenience-oriented things you can do with the ribbon.
Turning panes on and off
File Explorer is built with panels. It’s your call to decide what’s useful to you. Click the View tab to find the panes. The Navigation pane is what you use to navigate through your hard disk. Click its icon on the View tab and uncheck ‘Navigation pane’ to turn it off, or check it to turn it on. For the Preview pane and Details pane (you can’t use both of them simultaneously), you can simply click on ‘Preview pane’ and ‘Details pane’ to turn them on and off.

Displaying hidden files and folders
Not everyone wants to see the plumbing of Windows, and this is why Microsoft hides many system files and folders, as well as file name extensions. But if you want to tweak how Windows 8 works, you’ll need to have a look at the plumbing. On the View tab, check the box next to ‘Hidden items’ and ‘File name extensions’ to do the obvious.
Hiding files and folders
To hide those files and folders again, uncheck the ‘Hidden items’ checkbox. Want to hide more files and folders? Select them, click ‘Hide selected items’ near the right edge of the Ribbon’s View tab.
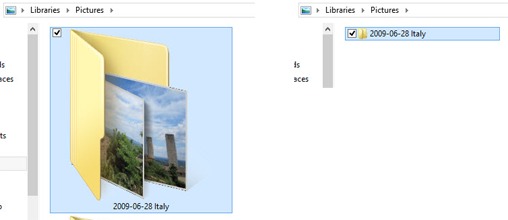
Changing icon sizes
While you’re on the View tab, you can change the size of the icons that represent files and folders. You’ll find these options just to the right of the icons for turning panes on and off. Here’s what you see when you choose extra-large icons (left) or small icons (right).
Adding columns
When you open a folder, File Explorer shows three columns by default: date modified, type and size. But you can add columns to show other information, such as the date it was created, its author, tags and more. Go to the View tab’s ‘Current view’ group and click the down arrow next to ‘Add columns’ to add them.

Near ‘Add columns’, you have several options to change how those columns display, including how you want to sort them, group them and make all of them to fit on a single screen.
Using the invert selection feature
Let’s say that you’ve hand-selected certain files in a folder by holding down the Ctrl key while clicking them. Once you’ve selected them, you can perform a common task on all of them. Let’s say you’ve got 150 files in a folder, and you want to delete 120 of them. The obvious way to do it would be tediously hand-selecting all the 120 files one by one. Here’s where ‘Invert selection’ comes to your rescue. Select the 30 you don’t want to delete, and then click ‘Invert selection’. You’ve inverted the selection, and you can now mass-delete the 120 files.
Do you have any tips for Windows 8 File Explorer ? Share with us in the below comment box: