Have you installed Windows 8 on a PC recently? Surely, you need to get those files of yours from your Windows 7 PC. Because I recently was clueless as to how to approach this. I found a pretty straightforward procedure where you need both your machines to be connected on your home network. The procedure is this… you can transfer files between both the PCs by sharing a folder on the Windows 7 machine and then mapping to that folder in Windows 8 as a network drive. However, the downside of this procedure is that it involves a series of many steps. However, it’s easy and fast if you can follow the below steps and screenshots.
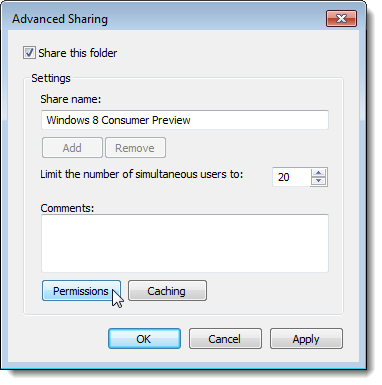
You need to share a folder on your Windows 7 PC. For this, you should create a new folder, right-click on it, and select Properties. On the Properties dialog box, click the Sharing tab and then click Advanced Sharing. On the Advanced Sharing dialog box, click “Share this folder” check box to turn on sharing for this folder. Click Permissions now.
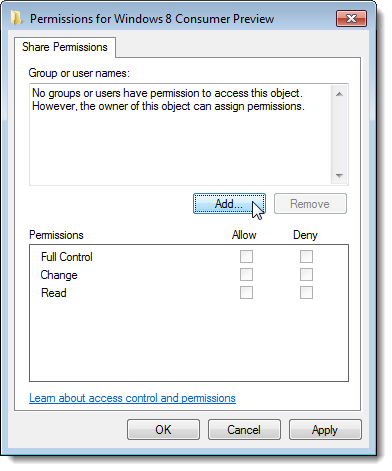
On the dialog box, you’ll see ‘Everyone’ listed. This permits everyone connected in the network to access what is shared. To restrict access, you need to remove ‘Everyone’ by clicking on it and choosing ‘Remove’. Now click on ‘Add’
In this dialogue box, you can type in the user’s names to whom you want to provide the permission and click ‘OK’. You can now go ahead and close all the dialog boxes that you have opened so far.
The next thing we need to do is find out the IP address of your Windows 7 PC. (To check your IP address, type ‘cmd’ in your search box, open ‘cmd.exe.’ and type ‘ipconfig’ at the command prompt. You can find your IP address under the adapter specifications near ‘IPv4 address’) You are now successfully done with the procedures in your Windows 7 PC.
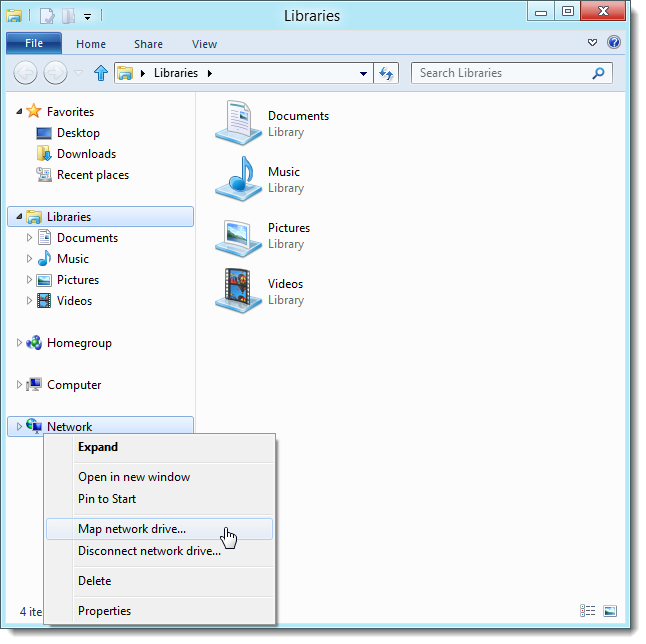
You can now seat yourself before the Windows 8 PC and follow these steps to establish the sharing of files. Firstly, open your Windows File Explorer (Which can be usually found in the taskbar in your desktop). In the navigation pane on Explorer window, right-click on Network and select Map network drive from the popup menu.
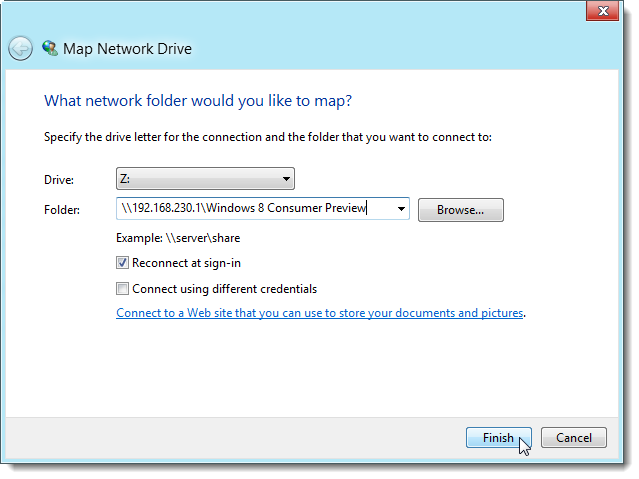
Select a letter to represent the drive from the drop-down list. You can see a ‘Folders’ text field. This is where you enter the IP address of your Windows 7 PC. Be sure to use two backslashes before the IP address and one before the name of the shared folder. Click Finish.
It may now take a few seconds to find your Windows 7 PC after which you may have to enter your user name and password for authentication. You can ask your PC to remember the credentials by checking on the check box near that option. You may see a message telling you that “Network discovery and file sharing are turned off.” If so, click the message and select Turn on network discovery and file sharing from the popup menu. Another dialog box is expected to popup asking if you want to turn it on for all public networks. It’s your wish really, but it’s advisable to not indulge in it for security reasons.
Successfully, after this, you should see your shared folder from your Windows 7 PC under Computer in the Navigation pane in Windows Explorer.


